Validate AEM Dispatcher Config Like Cloud Manager
Most AEM projects keep a root-level dispatcher/ folder (as generated by the AEM Project Archetype). If your repo doesn’t have it yet, create one using the archetype or copy a starter from your team, and place it alongside your top-level pom.xml.
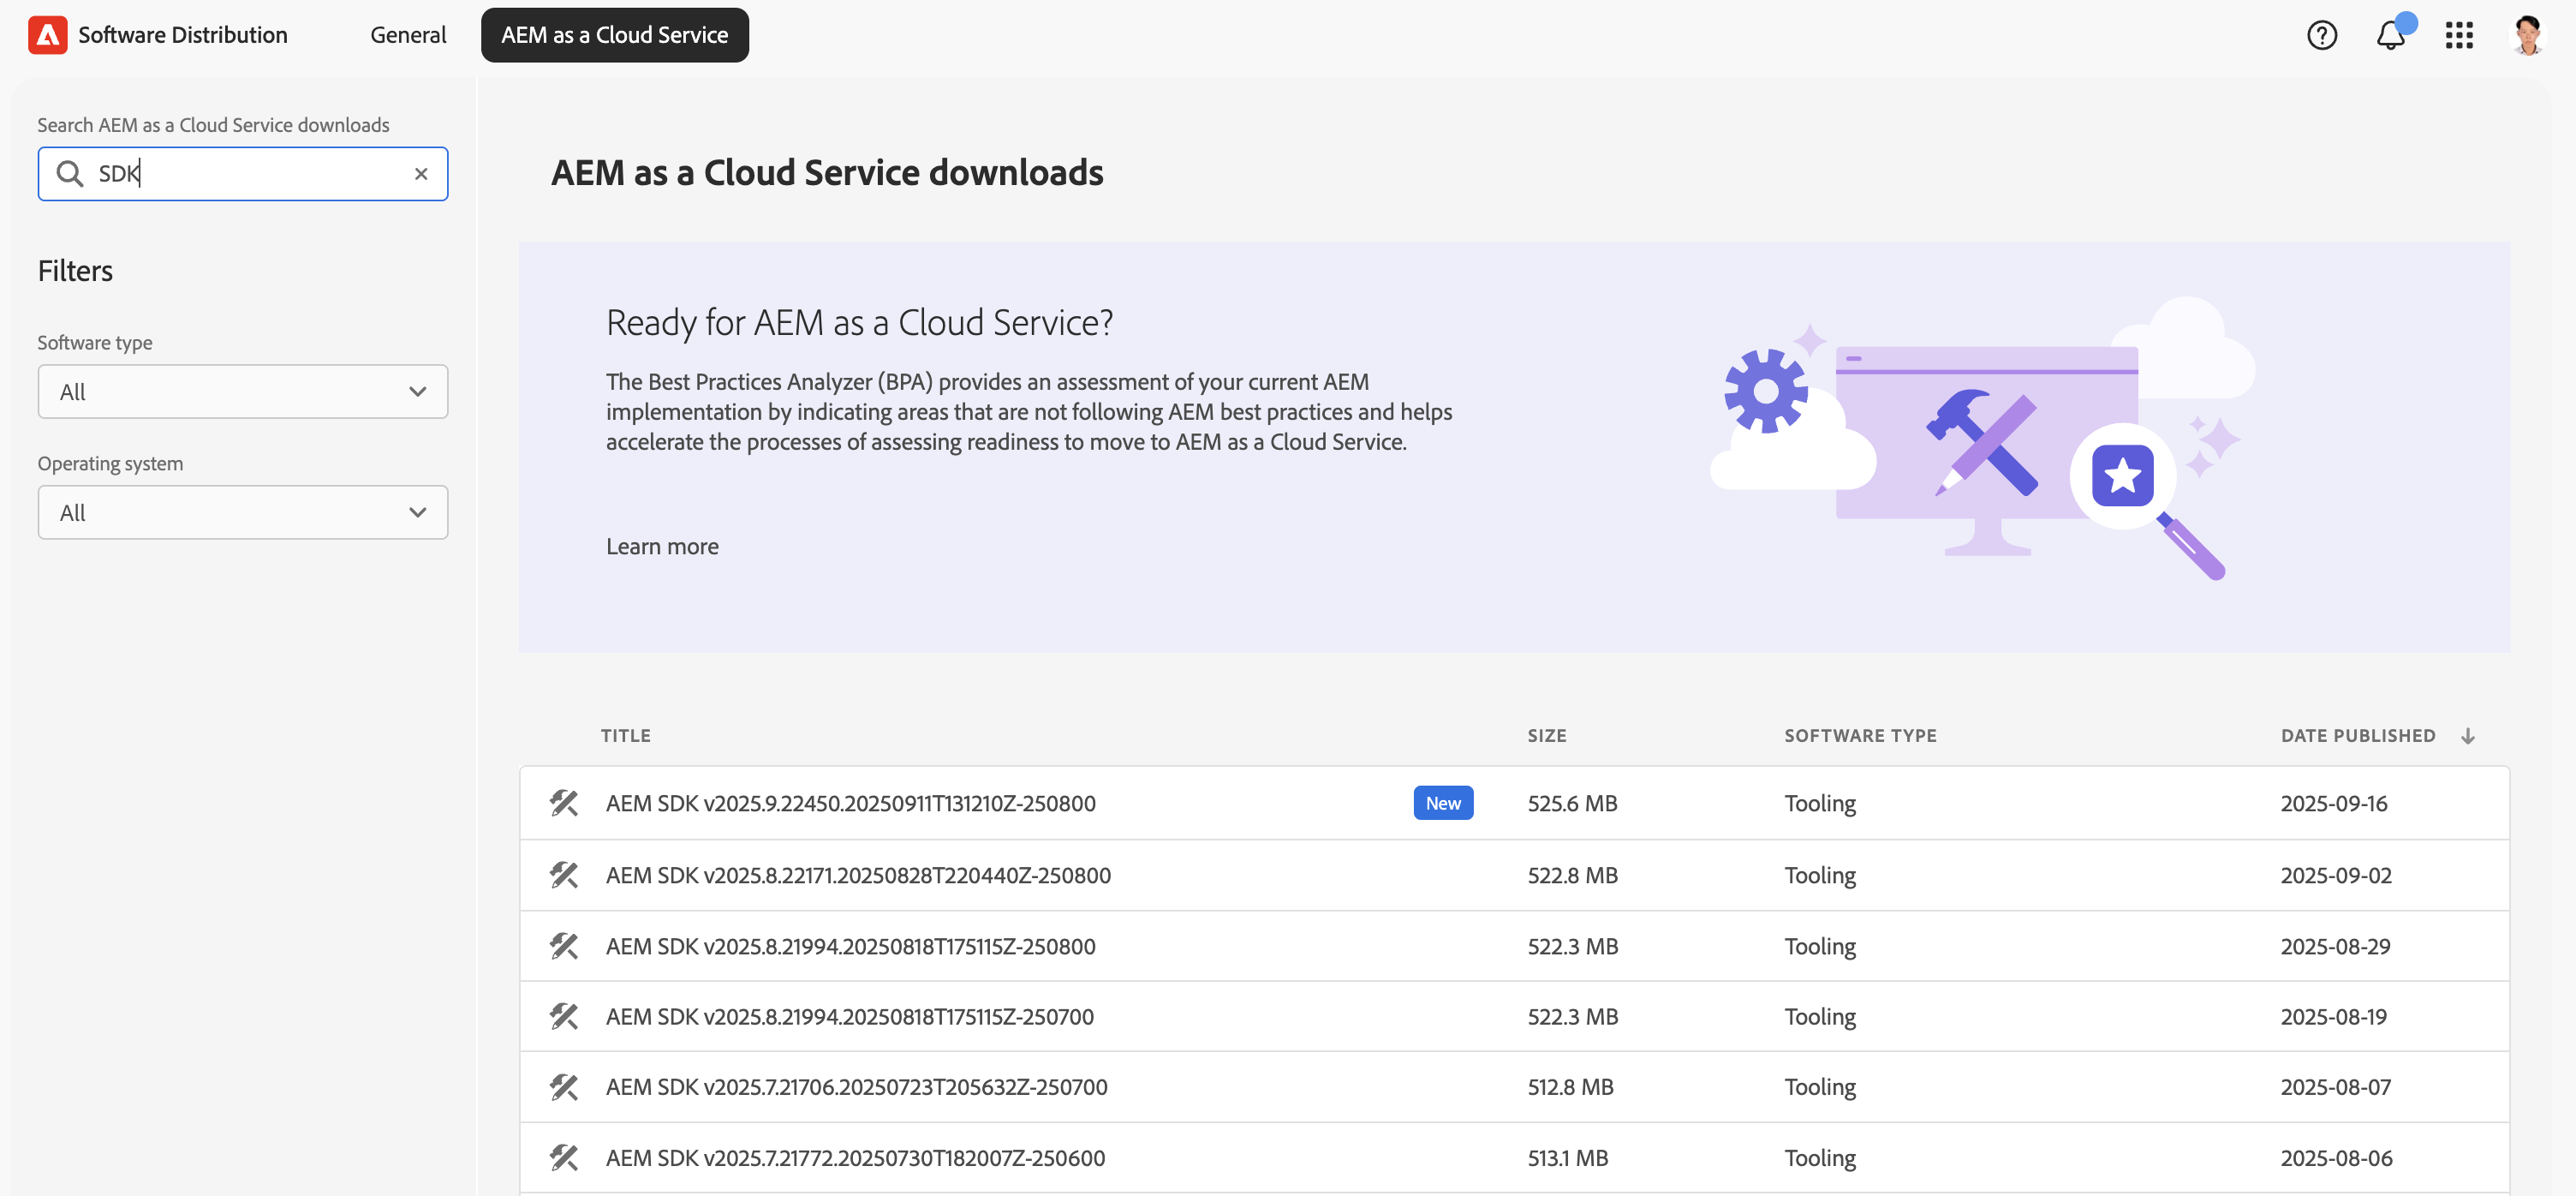
Then download the AEM as a Cloud Service SDK from Adobe Software Distribution to get the Dispatcher Tools (validate.sh, docker_run.sh). For a step-by-step SDK setup, see: https://www.shiftsaas.com/adobe-experience-manager/setting-up-aem-sdk-local-environment
Set Up Local Dispatcher Validation with the AEM SDK
Download the latest AEM SDK from Adobe’s Software Distribution portal to mirror Cloud Manager locally and validate configurations with the most recent release.
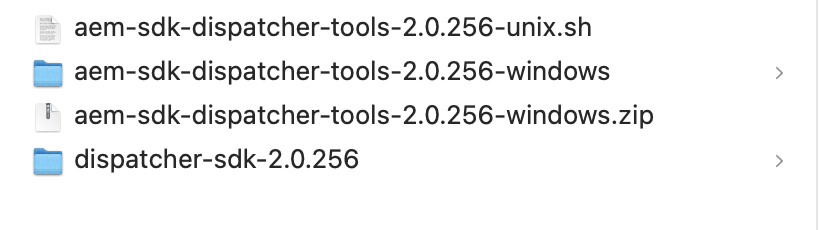
After extracting the SDK you’ll find scripts for macOS/Linux and a zip for Windows, plus docs, lib and example sources.
macOS / Linux (example):
chmod +x aem-sdk-dispatcher-tools-2.0.256-unix.sh
./aem-sdk-dispatcher-tools-2.0.256-unix.shWindows: unzip the package and follow the included README — no shell commands required.
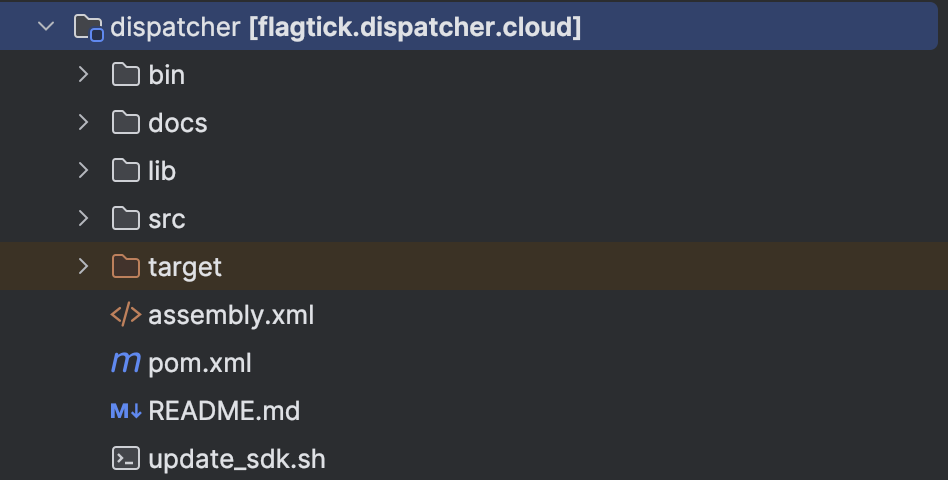
Inside the Dispatcher SDK you will find the bin/, docs/, lib/, and src/ folders. These give you the scripts, documentation, validator tools, and images you need to validate your configs and run Cloud Manager-style checks locally.
Example tree (for orientation):
dispatcher-sdk-2.0.256 % tree
.
├── README
├── bin
│   ├── docker_immutability_check.sh
│   ├── docker_run.sh
│   ├── docker_run_hot_reload.sh
│   ├── update_maven.sh
│   ├── validate.sh
│   ├── validator -> ./validator-darwin-arm64
│   ├── validator-darwin-arm64
│   └── validator-linux-arm64
├── docs
│   ├── README.html
│   ├── TransitionFromAMS.html
│   ├── TroubleShooting.html
│   └── Validator.html
├── lib
│   ├── configuration_reloading.sh
│   ├── dispatcher-publish-amd64.tar.gz
│   ├── dispatcher-publish-arm64.tar.gz
│   ├── dummy_gitinit_metadata.sh
│   ├── httpd-reload-monitor
│   ├── httpd-vhosts
│   ├── immutability_check.sh
│   ├── import_sdk_config.sh
│   └── overwrite_cache_invalidation.sh
└── srcCopy the bin/, docs/, and lib/ folders into your project dispatcher/ folder. After copying, your project tree should include dispatcher/bin, dispatcher/docs, dispatcher/lib, and dispatcher/src.
From your dispatcher module run the validator to mirror Cloud Manager’s checks. The typical command sequence:
cd dispatcher
./bin/validate.sh srcWhat the validator checks
- Static rule checks
- Apache/Dispatcher syntax checks (inside Docker)
- Immutable-file parity checks
When prompted: “Do you want to update the immutable files?”
- yes → updates baseline immutable files (use when upgrading SDK)
- no → keeps your current baseline (use for regular validation)
Tip: Use yes only during planned upgrades. For normal day-to-day validation, choose no.
Domain Mapping Models: Cloud Manager vs Dispatcher
Model 1: Domain Mapped in Adobe Cloud Manager (AEMaaCS)
When Cloud Manager handles domain mapping, the Dispatcher does not receive the real domain.
Adobe’s CDN normalizes the incoming Host header before passing the request to Dispatcher.
Therefore, your vhost only needs a generic “accept everything” configuration:
ServerName  "publish"
ServerAlias "*"
DocumentRoot "${DOCROOT}"Explanation (short & clear):
- ServerName “publish” → internal identifier only — never matched against real domains.
- ServerAlias “*” → accept all domains because Cloud Manager/CDN has already normalized the traffic.
- DocumentRoot “${DOCROOT}” → must point to your standard publish DocumentRoot.
Supported automatically (no extra vhosts needed):
portaldev.flagtick.comportalstg.flagtick.comportal.flagtick.com
Use this pattern when Cloud Manager manages your domain.
It keeps Dispatcher configuration simple and avoids Phase-1 validation errors.

Model 2: Domain Mapped Directly to Dispatcher (DNS → Dispatcher)
In this model, Dispatcher — not Cloud Manager — receives the real domain, because DNS resolves the domain straight to the Dispatcher’s IP.
This means the Dispatcher must match the domain explicitly in its vhost:
ServerName portaldev.flagtick.com
ServerAlias portaldev.flagtick.local
ServerAlias flagtick.cloud

DocumentRoot "${DOCROOT}"Why explicit domain matching is required
- Dispatcher receives the raw
Hostheader - No CDN or Cloud Manager to normalize domains
- Dispatcher must decide which vhost/farm to use based on the exact hostname
- Any host not listed here → falls back to default vhost or returns 404
This ensures correct:
- environment separation (DEV/STG/PROD)
- farm selection
- filter rules
- caching behavior

Using table below which highlights the operational differences between Cloud Manager–mapped and Dispatcher-mapped domains:
| Feature | Cloud Manager (AEMaaCS) | Dispatcher-mapped (On-prem/AMS/Local) |
|---|---|---|
| Who maps the domain? | Adobe CDN | Dispatcher |
| vhost pattern | ServerAlias “*” | ServerName real-domain.com |
| Dispatcher matches Host header? | No | Yes |
| CDN present? | Always | Not required |
| Used for | DEV/STAGE/PROD AEM Cloud | On-prem/AMS/Local Dispatcher/AEM Cloud |
Important: Adobe CDN ≠ Dispatcher.
CDN handles global edge routing, TLS, domain mapping, WAF, and caching.
Dispatcher handles Apache routing, filtering, and AEM publish caching.
Understanding Validator Phases and How to Resolve Errors
Before running the validator, first verify which domain-mapping model your project uses
(see Domain Mapping Models: Cloud Manager vs Dispatcher).
This determines which vhost pattern is correct:
- Cloud Manager/CDN model → use wildcard vhost (
ServerAlias "*") - DNS → Dispatcher model → use explicit domain vhosts (
ServerName real-domain.com)
This section now focuses purely on validation behavior, common failures, and how to fix them quickly.
Quick Pre-Validation Checklist — run these steps before validate.sh to avoid common Phase-1 failures.
cd dispatcher

# vhost symlinks must exist
ls -la src/conf.d/enabled_vhosts

# farm symlinks must exist
ls -la src/conf.dispatcher.d/enabled_farms

# check Apache syntax before Docker runs it
httpd -t   # or apachectl -t

# confirm AEM Publish is reachable
curl -I http://host.docker.internal:4503 || curl -I http://localhost:4503Example: Cloud Manager–mapped vhost (Case 1)
(You can name the file flagtick.vhost, default.vhost, wknd.vhost, etc.—the filename doesn’t matter in Case 1.)
# Include customer defined variables
Include conf.d/variables/custom.vars

<VirtualHost *:80>
    ServerName	"publish"
    # Put names of which domains are used for your published site/content here
    ServerAlias	 "*"
    # Use a document root that matches the one in conf.dispatcher.d/default.farm
    DocumentRoot "${DOCROOT}"
    # URI dereferencing algorithm is applied at Sling's level, do not decode parameters here
    AllowEncodedSlashes NoDecode
    # Add header breadcrumbs for help in troubleshooting
    <IfModule mod_headers.c>
        Header add X-Vhost "publish"
    </IfModule>
    <Directory />
        <IfModule disp_apache2.c>
            # Some items cache with the wrong mime type
            # Use this option to use the name to auto-detect mime types when cached improperly
            ModMimeUsePathInfo On
            # Use this option to avoid cache poisioning
            # Sling will return /content/image.jpg as well as /content/image.jpg/ but apache can't search /content/image.jpg/ as a file
            # Apache will treat that like a directory.  This assures the last slash is never stored in cache
            DirectorySlash Off
            # Enable the dispatcher file handler for apache to fetch files from AEM
            SetHandler dispatcher-handler
        </IfModule>
        Options FollowSymLinks
        AllowOverride None
        # Insert filter
        SetOutputFilter DEFLATE
        # Don't compress images
        SetEnvIfNoCase Request_URI \.(?:gif|jpe?g|png)$ no-gzip dont-vary
        # Prevent clickjacking
        Header always append X-Frame-Options SAMEORIGIN
    </Directory>
    <Directory "${DOCROOT}">
        AllowOverride None
        Require all granted
    </Directory>
    <IfModule disp_apache2.c>
        # Enabled to allow rewrites to take affect and not be ignored by the dispatcher module
        DispatcherUseProcessedURL	On
        # Default setting to allow all errors to come from the aem instance
        DispatcherPassError		0
    </IfModule>
    <IfModule mod_rewrite.c>
        RewriteEngine	on
        Include conf.d/rewrites/rewrite.rules

        RewriteCond %{HTTP:X-Forwarded-Proto} !https
        RewriteCond %{REQUEST_URI} !^/dispatcher/invalidate.cache
        RewriteRule (.*) https://%{HTTP_HOST}%{REQUEST_URI} [L,R=301]

        # Rewrite index page internally, pass through (PT)
        RewriteRule "^(/?)$" "/index.html" [PT]

    </IfModule>
</VirtualHost>Example: Dispatcher-mapped vhost (Case 2 — DNS → Dispatcher)
## FlagTick DEV Publish virtual host
<VirtualHost *:80>
    AllowEncodedSlashes On

    ## Primary hostname for FlagTick DEV publish
    ServerName    portaldev.flagtick.com
    ServerAlias   portaldev.flagtick.local
    ServerAlias   flagtick.cloud

    ## Dispatcher document root
    DocumentRoot ${DOCROOT}

    <IfModule mod_headers.c>
        Header always add X-Vhost "flagtick-publish-dev"
        Header merge X-Frame-Options SAMEORIGIN "expr=%{resp:X-Frame-Options}!='SAMEORIGIN'"
        Header merge X-Content-Type-Options nosniff "expr=%{resp:X-Content-Type-Options}!='nosniff'"
        Header set Permissions-Policy "browsing-topics=()"
    </IfModule>

    <Directory />
        <IfModule disp_apache2.c>
            ModMimeUsePathInfo On
            DirectorySlash Off
            SetHandler dispatcher-handler
        </IfModule>
        Options FollowSymLinks
        AllowOverride None
    </Directory>

    <Directory "${DOCROOT}">
        AllowOverride None
        Require all granted
    </Directory>

    <IfModule disp_apache2.c>
        DispatcherUseProcessedURL 1
        DispatcherPassError  0
    </IfModule>

    <IfModule mod_rewrite.c>
        RewriteEngine on

        ## Enforce HTTPS
        RewriteCond %{HTTP:X-Forwarded-Proto} !https
        RewriteCond %{REQUEST_URI} !^/dispatcher/invalidate.cache
        RewriteRule (.*) https://%{SERVER_NAME}%{REQUEST_URI} [L,R=301]

        ## Project-specific rewrites
        Include conf.d/rewrites/flagtick_301_rewrite.rules
        Include conf.d/rewrites/portal_dev_rewrite.rules
        Include conf.d/rewrites/rewrite.rules
    </IfModule>
</VirtualHost>Enable and validate the vhost
# 1. Enable the vhost (if not already)
ln -s ../available_vhosts/flagtick.vhost src/conf.d/enabled_vhosts/flagtick.vhost

# 2. Run validator
./bin/validate.sh srcEnable both vhost and farm
ln -s ../available_vhosts/portal_dev_publish.vhost
src/conf.d/enabled_vhosts/portal_dev_publish.vhost

ln -s ../available_farms/portal_dev_publish.farm src/conf.dispatcher.d/enabled_farms/portal_dev_publish.farmAdd a hosts entry (local testing):
127.0.0.1 portaldev.flagtick.localThen:
- Local Author (4502):
http://portaldev.flagtick.local:4502/ - Local Publish (4503):
http://portaldev.flagtick.local:4503/ - Dispatcher SDK (8080/8081):
http://portaldev.flagtick.local:8081/
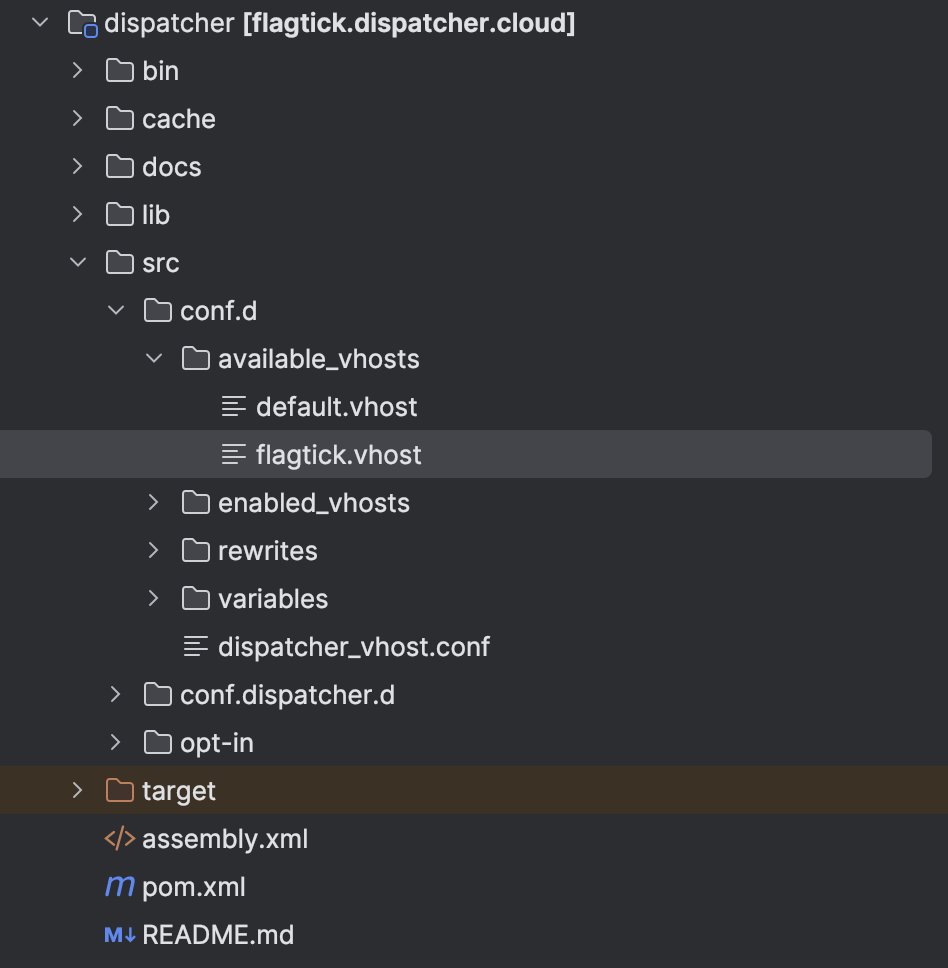
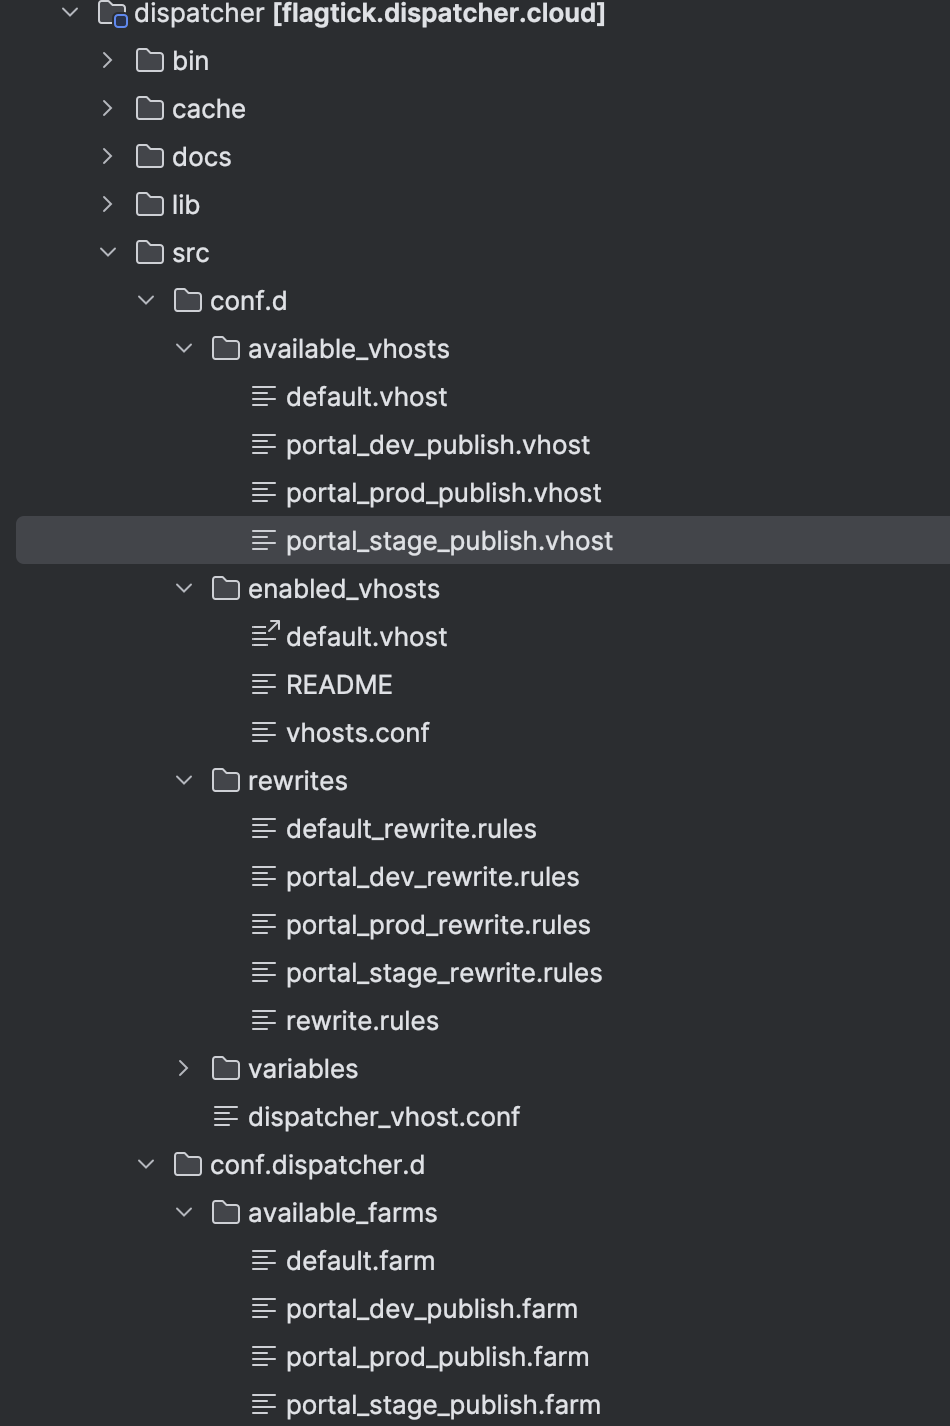
Below folder structure keeps the configuration organized and makes validation easier. Each environment’s vhost and farm can be tested separately with the Dispatcher SDK or Docker before deploying to Adobe Cloud Manager.
One of the most common Phase 1 screw-ups is when the validator says it can’t find any .vhost files in conf.d/enabled_vhosts/.
./bin/validate.sh src
Phase 1: Dispatcher validator
Error: no .vhost files found in conf.d/enabled_vhosts/
Warning: ignoreUrlParameters not set in farm (marketing params recommended)
Phase 1 failedThat usually means you copied the vhost files instead of linking them, or the symlinks got wiped. Cloud Manager only cares about symlinks in enabled_vhosts/, so the fix is easy: keep the real files in available_vhosts/ and drop links back in with ln -s.
ln -s ../available_vhosts/default.vhost src/conf.d/enabled_vhosts/default.vhostAfter fixing the symlinks, it is a good idea to double-check that Apache can actually parse your configs before re-running the full validator. The simplest way is by running the built-in syntax check:
httpd -tOn macOS, the main config file is typically located at /etc/apache2/httpd.conf. If you see the warning about “Could not reliably determine the server’s fully qualified domain name”, you can fix it by editing that file and setting:
ServerName localhostValidate routing, caching, and filter rules in the same runtime as Cloud Manager. Install and run Docker locally to avoid errors:
Next, move into the dispatcher lib directory, locate the file (e.g., dispatcher-publish-arm64.tar.gz), and load it into Docker Desktop:
cd ../dispatcher/lib
docker load -i dispatcher-publish-arm64.tar.gzOnce loaded, open Docker Desktop and confirm the Dispatcher Adobe image is available by running:
% docker images
REPOSITORY                        TAG       IMAGE ID       CREATED       SIZE
adobe/aem-cs/dispatcher-publish 2.0.256 86f18dd3966f 6 weeks ago 149MBWith the image confirmed, you can now start the dispatcher container. First, prepare an out folder with your config, then launch using the provided script:
cd dispatcher
mkdir out
cp -R src/* out/
./bin/docker_run.sh out host.docker.internal:4503 8080

or
./bin/validator full -d out src
./bin/docker_run.sh out host.docker.internal:4503 8080 Note: This mounts your dispatcher configuration into the container and connects it to your local AEM Publish instance running on port 4503.
There is common issue which that Dispatcher starts but can’t reach AEM Publish on port 4503, so the script keeps retrying with the ‘Sleeping for 5s…’ message.
%./bin/validator full -d out src
%./bin/docker_run.sh out host.docker.internal:4503 8080
Darwin MacBook-Pro-cua-Vuong.local 24.6.0 Darwin Kernel Version 24.6.0: Mon Jul 14 11:30:40 PDT 2025; root:xnu-11417.140.69~1/RELEASE_ARM64_T8132 arm64
/bin/zsh
Running script /docker_entrypoint.d/05-display-image-version.sh
...
...
Waiting until port 4503 on host.docker.internal is available (with timeout of 1s)
Sleeping for 5s to wait until port 4503 on host.docker.internal is available
Sleeping for 5s to wait until port 4503 on host.docker.internal is availableIf 8080 is in use, run docker ps, stop the blocker with docker kill <id> (or docker rm -f <id>), or start Dispatcher on a different port.
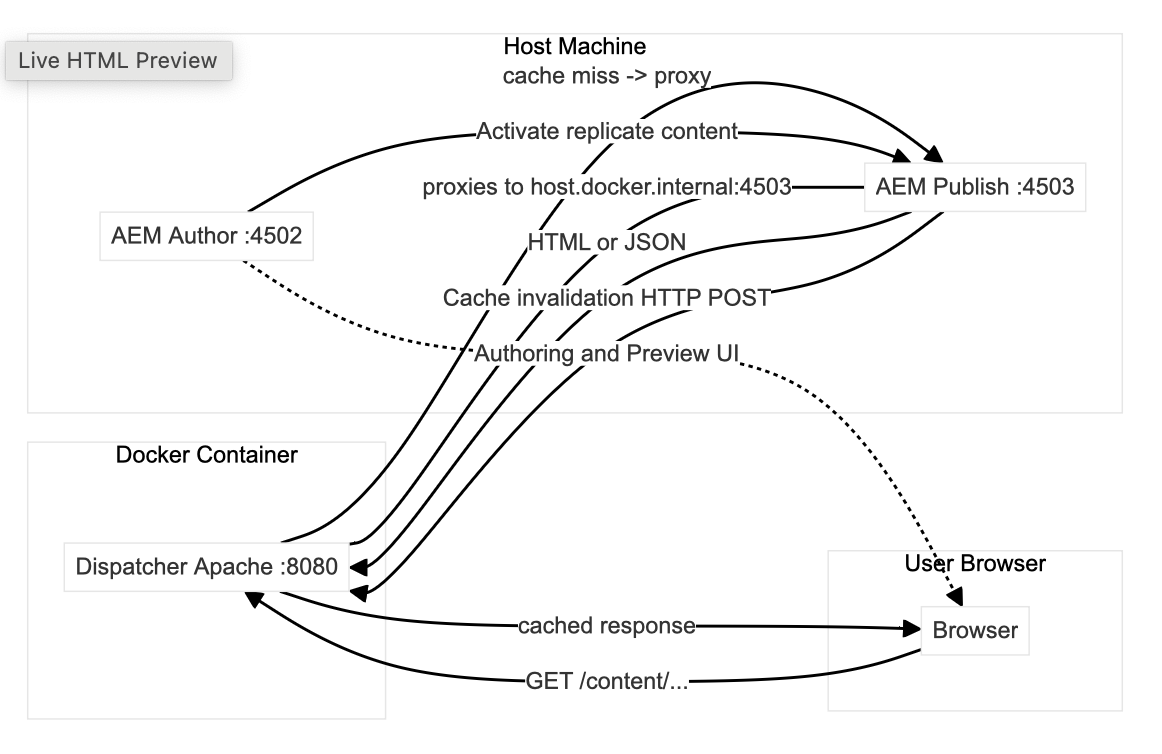
Which diagram below shows requests hitting Dispatcher (8080); cache misses proxy to Publish (4503). Author (4502) activates content to Publish and triggers cache invalidation back to Dispatcher.
Before moving further, when we add the SDK folders from AEMaaCS such as lib, docs, and bin into our local setup for validation, we should also update our .gitignore. This ensures these large SDK artifacts are not accidentally committed and pushed to AEMaaCS Cloud.
# dispatcher-sdk
dispatcher/lib
dispatcher/docs
dispatcher/bin
dispatcher/cache
dispatcher/outValidate Using WKND Prior to Your Project
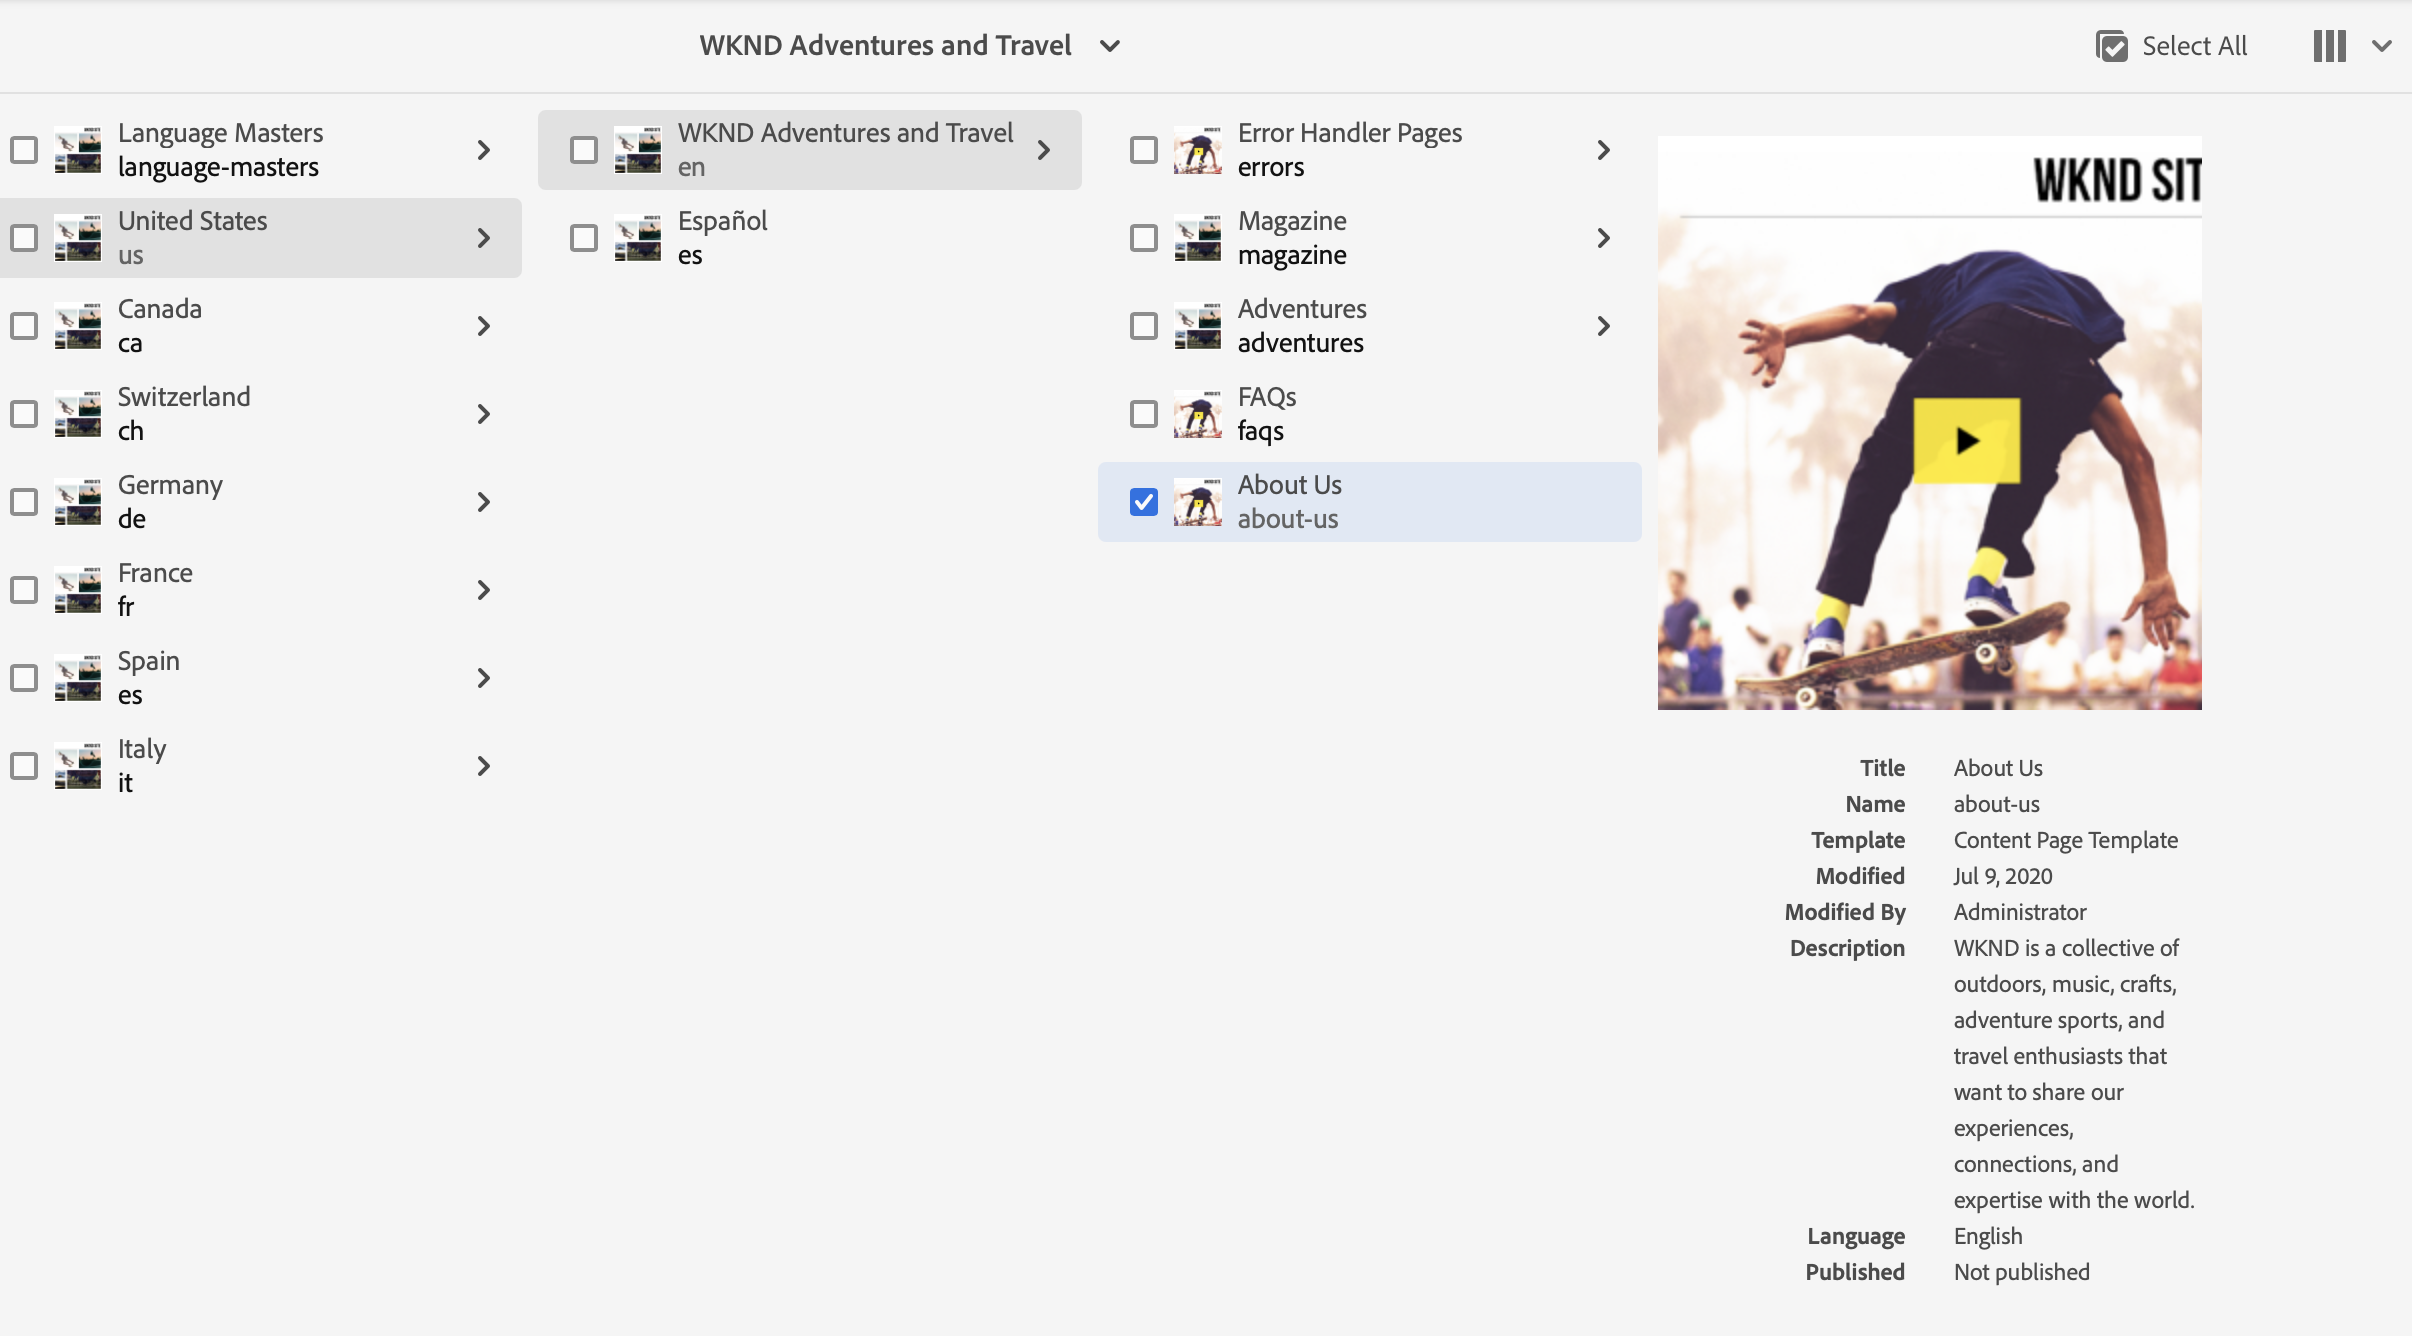
With Dispatcher running, the next step is to add real content — Adobe’s WKND site provides a complete AEM structure out of the box.
Note: If you are running Java 11 locally, use the WKND 3.2.0 release (for example, aem-guides-wknd.all-3.2.0.zip). For Java 21, you can install the latest WKND from Adobe’s GitHub: aem-guides-wknd
[INFO] ------------------------------------------------------------------------
[INFO] Reactor Summary for WKND Sites Project - Reactor Project 3.2.0:
[INFO]
[INFO] WKND Sites Project - Reactor Project ............... SUCCESS [  0.726 s]
[INFO] WKND Sites Project - Core .......................... SUCCESS [ 38.908 s]
[INFO] WKND Sites Project - UI Frontend ................... SUCCESS [ 38.375 s]
[INFO] WKND Sites Project - UI apps structure ............. SUCCESS [  1.040 s]
[INFO] WKND Sites Project - UI apps ....................... SUCCESS [  4.041 s]
[INFO] WKND Sites Project - UI content .................... SUCCESS [  1.411 s]
[INFO] WKND Sites Project - UI config ..................... SUCCESS [  0.162 s]
[INFO] WKND Sites Project - UI sample content ............. SUCCESS [  0.816 s]
[INFO] WKND Sites Project - All ........................... SUCCESS [ 42.472 s]
[INFO] WKND Sites Project - Integration Tests ............. SUCCESS [ 26.077 s]
[INFO] WKND Sites Project - Dispatcher .................... SUCCESS [  0.564 s]
[INFO] WKND Sites Project - UI Tests ...................... SUCCESS [  0.347 s]
[INFO] ------------------------------------------------------------------------
[INFO] BUILD SUCCESS
[INFO] ------------------------------------------------------------------------
[INFO] Total time:  02:47 min
[INFO] Finished at: 2025-09-27T21:19:01+07:00Next, copy the Dispatcher configuration from your custom project into the WKND setup, then update rewrite.rules to point the default page to portaldev.flagtick.local.
On AEM Publish (4503), WKND installs a root mapping through RootMappingServlet.cfg.json so that / resolves directly to /content/wknd/us/en.html. However, Dispatcher (8080) does not use Sling mappings.
// RootMappingServlet.cfg.json
{
    "rootmapping.target": "/content/wknd/us/en.html"
}

// rewrite.rules
# rewrite for root redirect
RewriteRule ^/?$ /content/${CONTENT_FOLDER_NAME}/us/en.html [PT,L]For redirecting to login.html, the configuration should be set up like this
// RootMappingServlet.cfg.json
{
    "rootmapping.target": "/content/<project>/us/login.html"
}

// rewrite.rules
# Map the root folder to the login page
RewriteRule ^/?$ /content/<project>/us/login.html [PT,L]That is why we copy our project’s Dispatcher configuration into WKND and update rewrite.rules — ensuring that hitting http://portaldev.flagtick.local:8080/ also goes to the intended homepage.
It is important to understand where different types of redirects should live. AEM itself is responsible for content-driven routing (like site root or language mapping), while Dispatcher is better suited for infrastructure-level redirects (like forcing HTTPS or handling domain aliases).
If redirect is business/content logic → do it in AEM
/etc/map.publish- Sling Resource Resolver
- Redirect Map Manager (ACS Commons, etc.)
If redirect is infra/domain routing → do it in Dispatcher
- e.g., force HTTPS, remove
www, vanity domain to homepage
Once your Dispatcher is up on 8080, you can test a few common checks to confirm it’s wired correctly with AEM Publish (4503).
First, hit the Dispatcher root — a 200 OK confirms it’s proxying to Publish.
curl -v http://portaldev.flagtick.local:8080/

* Host portaldev.flagtick.local:8080 was resolved.
* IPv6: (none)
* IPv4: 127.0.0.1, 127.0.0.1
*   Trying 127.0.0.1:8080...
* Connected to portaldev.flagtick.local (127.0.0.1) port 8080
> GET / HTTP/1.1
> Host: portaldev.flagtick.local:8080
> User-Agent: curl/8.7.1
> Accept: */*
>
* Request completely sent off
< HTTP/1.1 200 OK
< Date: Sun, 28 Sep 2025 03:34:06 GMT
< Server: Apache
< X-Frame-Options: SAMEORIGIN
< X-Content-Type-Options: nosniff
< Last-Modified: Sun, 28 Sep 2025 01:58:38 GMT
< ETag: "1dd2d-63fd2db7ebc91"
< Accept-Ranges: bytes
< Content-Length: 122157
< Cache-Control: max-age=300
< Expires: Sun, 28 Sep 2025 03:39:06 GMT
< Vary: Accept-Encoding
< X-Vhost: publish
< Content-Type: text/html;charset=utf-8
<
<!DOCTYPE HTML>Add a header to show whether requests are served from cache (HIT, MISS, REFRESH).
<IfModule mod_headers.c>
    Header always add X-Vhost "flagtick-publish-dev"
    Header merge X-Frame-Options SAMEORIGIN "expr=%{resp:X-Frame-Options}!='SAMEORIGIN'"
    Header merge X-Content-Type-Options nosniff "expr=%{resp:X-Content-Type-Options}!='nosniff'"
    Header set Permissions-Policy "browsing-topics=()"

    # Show Dispatcher cache state (HIT, MISS, REFRESH)
    Header add X-Cache-Status "%{DISP_CACHE_STATE}e"
</IfModule>If you want to check cache HIT or MISS in HTTP headers, note that the Local Dispatcher SDK doesn’t add this header by default — you have to configure it in Apache. Otherwise, the easiest way is to tail the log file with:
docker ps
docker exec -it <container_id> ls -l /var/log/apache2
docker exec -it <container_id> tail -f /var/log/apache2/dispatcher.log

curl -I http://portaldev.flagtick.local:8080/content/wknd/us/en.htmlIf the header isn’t available, you can always confirm caching status in the dispatcher log, which reports whether a request was served from cache (hit), fetched fresh (miss), or revalidated (refresh).
[28/Sep/2025:06:45:09 +0000] "HEAD /content/wknd/us/en.html HTTP/1.1" - hit [publishfarm/-] 8ms "portaldev.flagtick.local:8080"Dispatcher-Driven Request Routing
Think of the Dispatcher as the gateway in front of AEM Publish. Every request passes through it first. From here, it can serve cached content, rewrite URLs internally, send users to a new URL with a redirect, or pass the request through to another backend.
In this section, we will look at which behavior to use, where to configure it, and how to test each one.
Reverse Proxy Routing (using RewriteRule + [P])
Redirect Handling (301/302)
Internal URL Rewrites
AEM vs Backend Origin Decision Logic
Allowlist vs Proxy Routes
Wrapping up
You now have a Dispatcher configuration validated just like Cloud Manager. You built and deployed it, ran the container locally, checked logs (dispatcher.log), and confirmed cache/invalidation against Publish. Key takeaways: validate rules in Docker before pushing, always watch for HIT/MISS in headers, and keep vhost/filter rules as lean as possible.
Side note: Cloud Manager validation is stricter than local SDK defaults. Always sync your local dispatcher SDK version with the Cloud Manager version to avoid surprises.
What’s next
In the next part, we’ll move from the back-end Dispatcher to the front-end workflow in AEM. You’ll:
- Break down the ui.frontend module and its folder/package.json structure.
- Refine Webpack configs (
webpack.common.js,webpack.plugins.js,main.ts) for cleaner builds. - Use tools like webpack-bundle-analyzer, ESLint, and Stylelint for optimization and code quality.
- Automate clientlibs generation with
npm run clientlibs, integrating output intoui.apps. - Apply best practices for a lightweight and efficient AEM front-end development workflow.
Prereqs for the next article
- Docker Desktop installed.
- AEM Publish running locally (e.g.,
http://localhost:4503). - The Adobe Dispatcher Tools/SDK or AMS Dispatcher Docker image available.
- A hosts entry for your test domain (e.g.,
127.0.0.1 flagtick.local).
When you are ready, jump to: “Validate AEM Dispatcher Config Like Cloud Manager”.