Improving AEM Front-End Development Workflow
In the previous article, Validate AEM Dispatcher Config like Cloud Manager, we looked at keeping dispatcher configs in sync with Adobe’s validation process. That was mainly about the back-end setup.
This time, we will switch to the front-end workflow — where scripts, styles, and component assets live. With Webpack, clientlibs, and linting, you will learn how to:
- bundle and copy assets into AEM,
- enforce coding standards for JS, TS, and CSS,
- and debug/optimize more effectively.
Setting Up Webpack Entry and Output
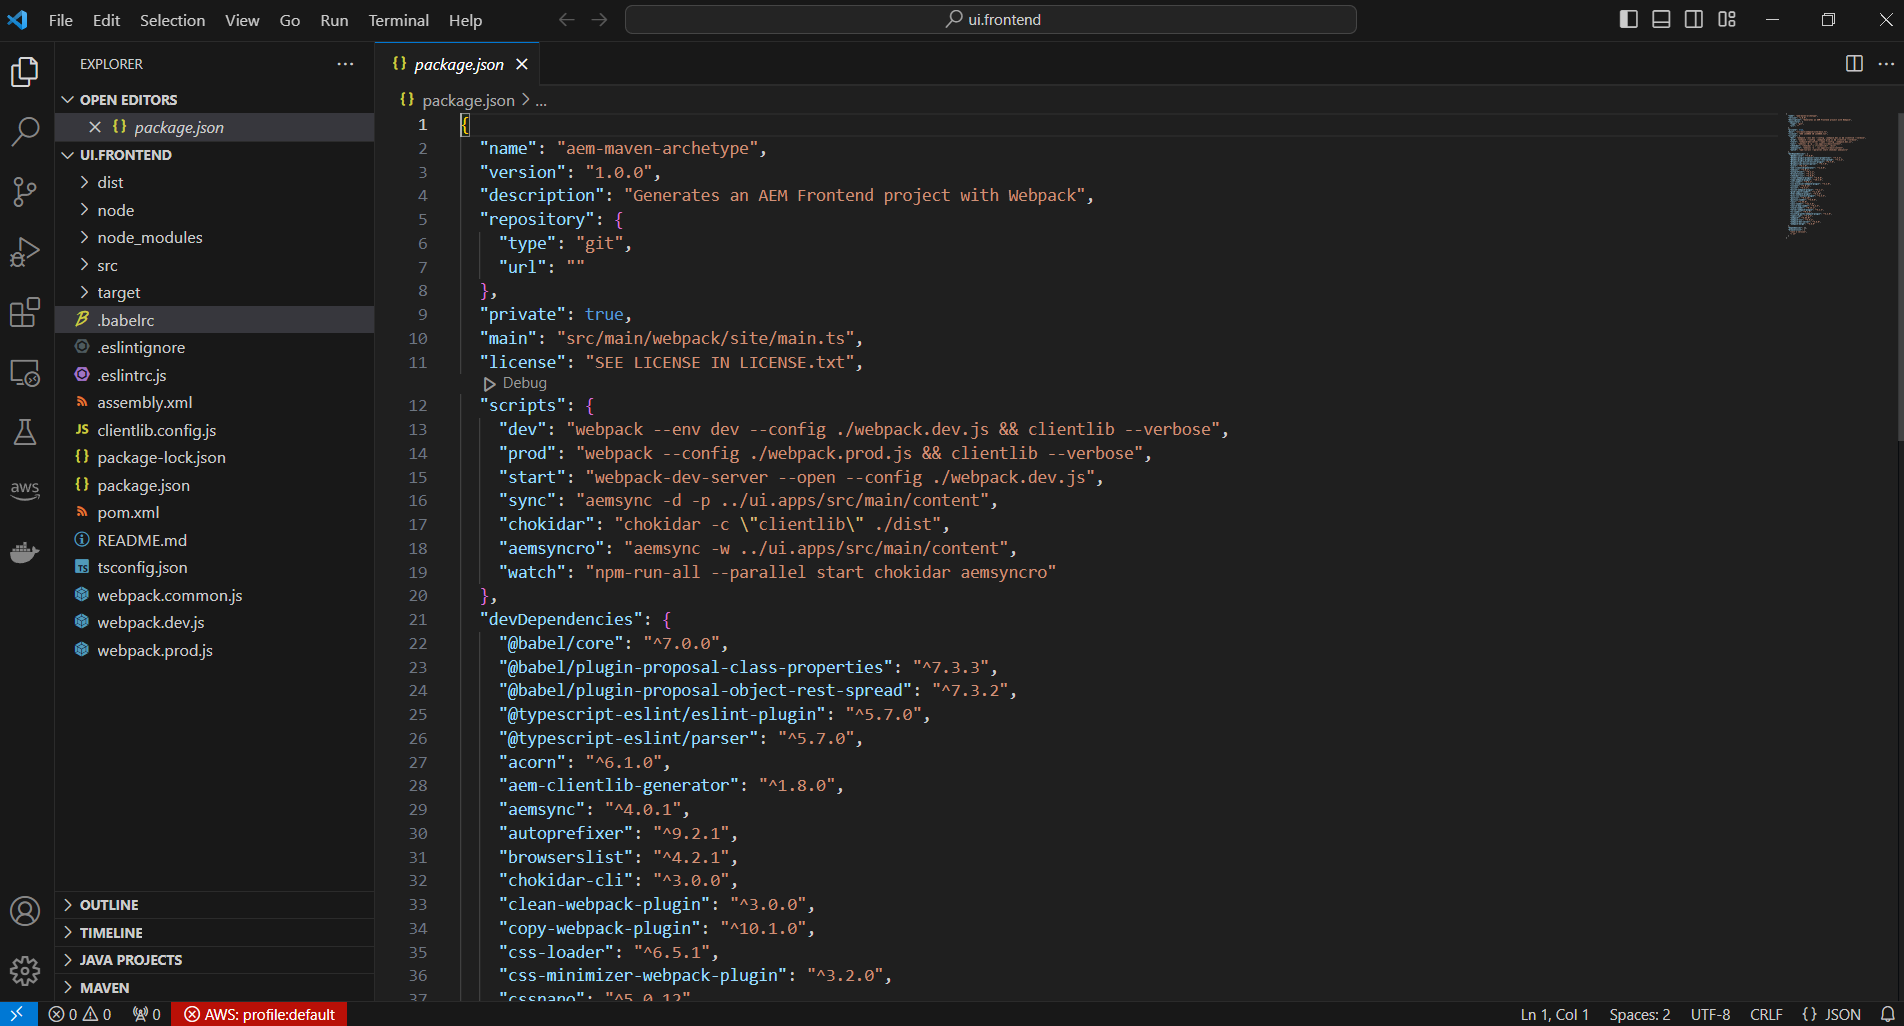
The package.json configuration in the ui.frontend module illustrates how scripts and dependencies are organized for front-end development.
Next, let us look at how Webpack handles the entry point and output path, which determine where compiled assets are placed.
» webpack.common.js
entry: {
        site: SOURCE_ROOT + '/site/main.ts'
},
output: {
    filename: (chunkData) => {
        return chunkData.chunk.name === 'dependencies' ? 'clientlib-dependencies/[name].js' : 'clientlib-site/[name].js';
    },
    path: path.resolve(__dirname, 'dist')
},After setting up the entry and output, we need to adjust SOURCE_ROOT. Since the Webpack config is placed inside the webpack folder, redefining SOURCE_ROOT ensures that script paths resolve properly as part of the improved front-end workflow.
» webpack.common.js
'use strict';

const path = require('path');
const config = require("./config.json").webpack;
const MiniCssExtractPlugin = require('mini-css-extract-plugin');
const TSConfigPathsPlugin = require('tsconfig-paths-webpack-plugin');
const CopyWebpackPlugin = require('copy-webpack-plugin');
const { CleanWebpackPlugin } = require('clean-webpack-plugin');
const ESLintPlugin = require('eslint-webpack-plugin');

const plugins = require('./webpack.plugins');

const ___dirname = path.resolve(__dirname, '..');
const SOURCE_ROOT = ___dirname + '/src/core/scripts';

// Entry points resolver
const entry = (function () {
  let entryPoints = {};
  Object.keys(config.entry).forEach(key => {
    entryPoints[key] = path.resolve(__dirname, config.entry[key]);
  });
  return entryPoints;
}());Once SOURCE_ROOT has been adjusted, the entry point comes into play. In this project, main.ts is responsible for importing global styles and recursively loading JavaScript and TypeScript modules.
// Stylesheets
import "./main.scss";

// Javascript or Typescript
import "./**/*.js";
import "./**/*.ts";
import '../components/**/*.js';In many tutorials, JavaScript and TypeScript files are grouped into a single folder (e.g., login.js, register.js, validate.js, …). However, if we organize our code by component — placing scripts and styles together (e.g., login/login.js and login/login.scss) — we can follow a different approach, as shown below.
// Stylesheets
import "./main.scss";

/* Components */
import '../../components/content/helloworld/helloworld.js';
import '../../components/content/login/login.js';
import '../../components/content/register/register.js';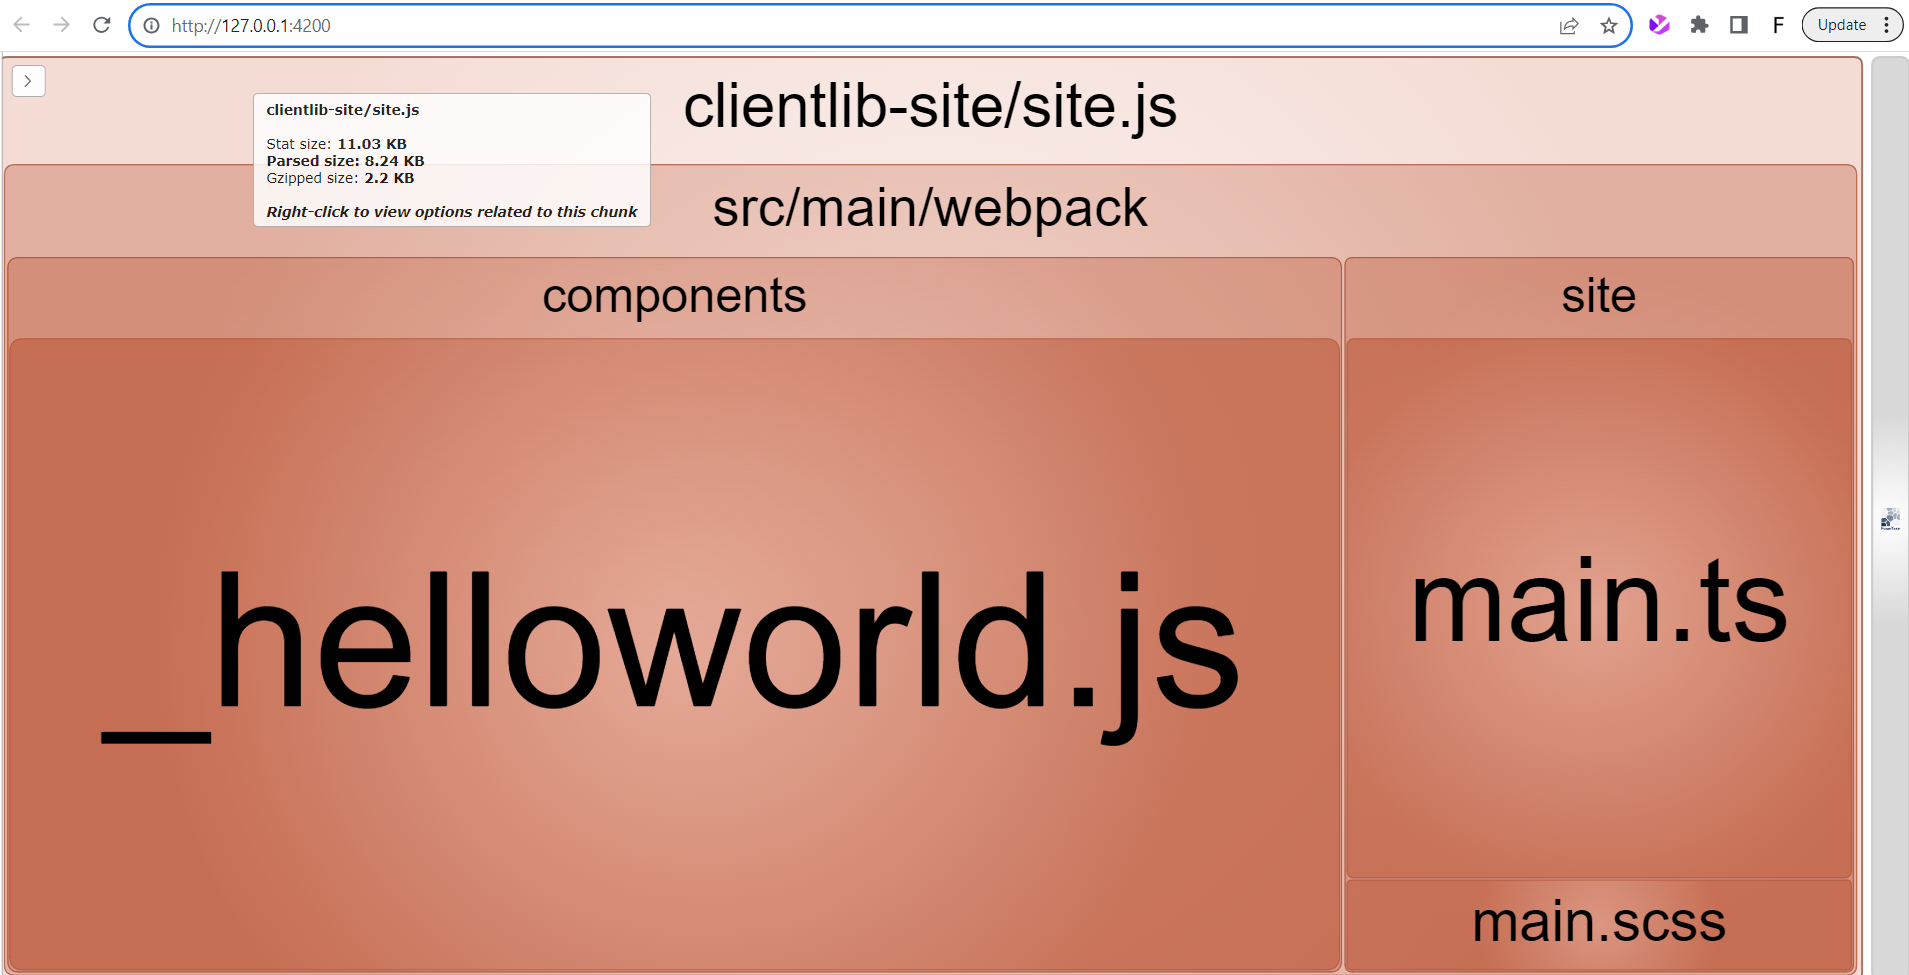
import '../../components/content/validate/validate.js';Bundle optimization comes next. The analyzeBundle script in package.json uses webpack-bundle-analyzer to show what’s inside the build.
» packages.json
"scripts": {
  ...
  "analyzeBundle": "webpack-bundle-analyzer --port 4200 ./dist/stats.json",
  ...
},Before running the analyzeBundle script, install webpack-bundle-analyzer in the ui.frontend module with the following command:
npm i webpack-bundle-analyzerAfter installing webpack-bundle-analyzer, the next step is to configure it. We will create a webpack.plugins.js file and register the plugin so it can be included in webpack.common.js.
» webpack.plugin.js
const _BundleAnalyzerPlugin = require("webpack-bundle-analyzer/lib/BundleAnalyzerPlugin");

const BundleAnalyzerPlugin = new _BundleAnalyzerPlugin({
    analyzerMode: 'disabled',
    generateStatsFile: true,
    statsOptions: { source: false }
});

module.exports = [
    BundleAnalyzerPlugin
];Once configured, running webpack-bundle-analyzer starts a local server at http://127.0.0.1:4200 where you can explore a visual breakdown of your bundled JavaScript files.
Instead of keeping MiniCssExtractPlugin, ESLintPlugin, and CleanWebpackPlugin inside webpack.common.js, we move them into webpack.plugins.js. Then, in webpack.common.js, we simply import that file and spread its contents into the plugins array, while still adding others like CopyWebpackPlugin:
const plugins = require('./webpack.plugins');

plugins: [
    ...plugins,
    new CopyWebpackPlugin({
      patterns:
        [
          {from: path.resolve(__dirname, SOURCE_ROOT + '/resources'), to: './clientlib-site/'}
        ]
    })
],Now that the plugins are in place, let us make debugging easier. Add devtool: "source-map" to your webpack.common.js. This tells Webpack to generate source maps so you can trace errors back to the original TypeScript or JavaScript code instead of the bundled output.
// webpack.common.js
module.exports = {
    resolve: resolve,
    devtool: 'source-map',
    entry: {
        site: SOURCE_ROOT + '/site/main.ts'
    },
    ...
}With source maps enabled for debugging, the next improvement is adding linting for stylesheets. Stylelint helps enforce coding standards, keep styles consistent, and automatically fix common issues. Add it to your webpack.plugins.js like this:
const _StylelintPlugin = require('stylelint-webpack-plugin');

const StylelintPlugin = new _StylelintPlugin({
    extensions: ['pcss'],
    fix: true
});

module.exports = [
    StylelintPlugin
];

// packages.json
"stylelint": "^13.13.1",
"stylelint-config-standard": "^22.0.0",
"stylelint-order": "^4.1.0",
"stylelint-webpack-plugin": "^2.2.0",After setting up Stylelint for stylesheets, the next step is handling configuration values. In larger projects or when working with sensitive data (like Cognito settings), using DefinePlugin is a clean way to inject environment variables into your build.
const _DefinePlugin = require('webpack').DefinePlugin;

const DefinePlugin = new _DefinePlugin({
  COGNITO_REGION: JSON.stringify(process.env.COGNITO_REGION),
  COGNITO_USER_POOL_ID: JSON.stringify(process.env.COGNITO_USER_POOL_ID),
  COGNITO_CLIENT_ID: JSON.stringify(process.env.COGNITO_CLIENT_ID),
});

module.exports = [
    DefinePlugin
];

// .env
COGNITO_REGION = xxxxxxx
COGNITO_USER_POOL_ID = xxxxxxxxxxxxxxx
COGNITO_CLIENT_ID = xxxxxxxxxxxxxxxxxxxxxxxxxxxAfter setting up environment variables with DefinePlugin, the next step is to centralize entry configuration in a config.json file and update webpack.common.js. Before that, run npm run clientlibs to generate the JS and CSS bundles that will be copied into the ui.apps module in AEM.
// ui.frontend/webpack/config.json

{
  "aem": {
    "clientlibsRoot": "ui.apps/src/main/content/jcr_root/apps/flagtick/clientlibs/",
    "componentsRoot": "ui.apps/src/main/content/jcr_root/apps/flagtick/components/"
  },
  "webpack": {
    "entry": {
      "site": "../src/core/scripts/main/main.ts",
      "author": "../src/author/scripts/main/main.ts"
    },
    "publicPath": "/etc.clientlibs/flagtick/clientlibs/clientlib-site/resources/"
  }
}Run the following command to generate the JavaScript and CSS bundles, copy them into the ui.apps module in AEM, and organize them within the correct folder structure.
npm run clientlibsExample output:
processing clientlib: clientlib-dynamic-modules
Write node configuration using serialization format: xml
write clientlib json file: /Users/macbook/Documents/Work/Flagtick/Code/ui.apps/src/main/content/jcr_root/apps/flagtick/clientlibs/clientlib-dynamic-modules/.content.xml

processing clientlib: clientlib-author
Write node configuration using serialization format: xml
write clientlib json file: /Users/macbook/Documents/Work/Flagtick/Code/ui.apps/src/main/content/jcr_root/apps/flagtick/clientlibs/clientlib-author/.content.xml

write clientlib asset txt file (type: css): /Users/macbook/Documents/Work/Flagtick/Code/ui.apps/src/main/content/jcr_root/apps/flagtick/clientlibs/clientlib-author/css.txt
copy: clientlib-author/author.css /Users/macbook/Documents/Work/Flagtick/Code/ui.apps/src/main/content/jcr_root/apps/flagtick/clientlibs/clientlib-author/css/author.css

processing clientlib: clientlib-author-dialog
Write node configuration using serialization format: xml
write clientlib json file: /Users/macbook/Documents/Work/Flagtick/Code/ui.apps/src/main/content/jcr_root/apps/flagtick/clientlibs/clientlib-author-dialog/.content.xml

write clientlib asset txt file (type: js): /Users/macbook/Documents/Work/Flagtick/Code/ui.apps/src/main/content/jcr_root/apps/flagtick/clientlibs/clientlib-author-dialog/js.txt

write clientlib asset txt file (type: css): /Users/macbook/Documents/Work/Flagtick/Code/ui.apps/src/main/content/jcr_root/apps/flagtick/clientlibs/clientlib-author-dialog/css.txtThis is a simplified description that shows the clientlibs JSON copying process without detailing each step individually, including:
- starting the aem-clientlib-generator
- processing the clientlib: clientlib-site
- processing the clientlib: clientlib-dynamic-modules
- processing the clientlib: clientlib-author
Client Libraries & AEM Front-End Workflow
We have diagram which shows shows how client libraries are organized in an AEM project. Core clientlibs and project-specific bundles work together with the Webpack output, providing CSS to the page head and JavaScript to the bottom of the HTML body.
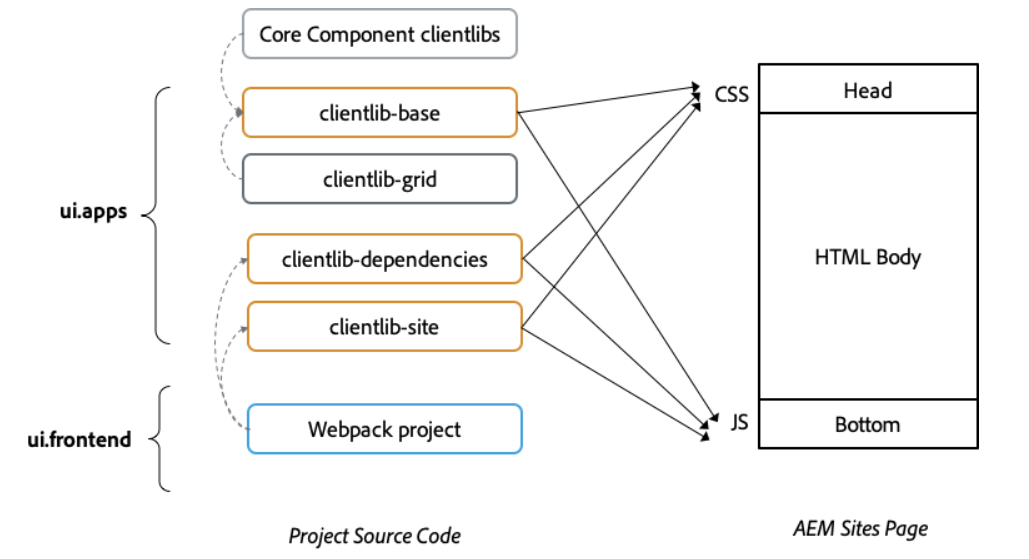
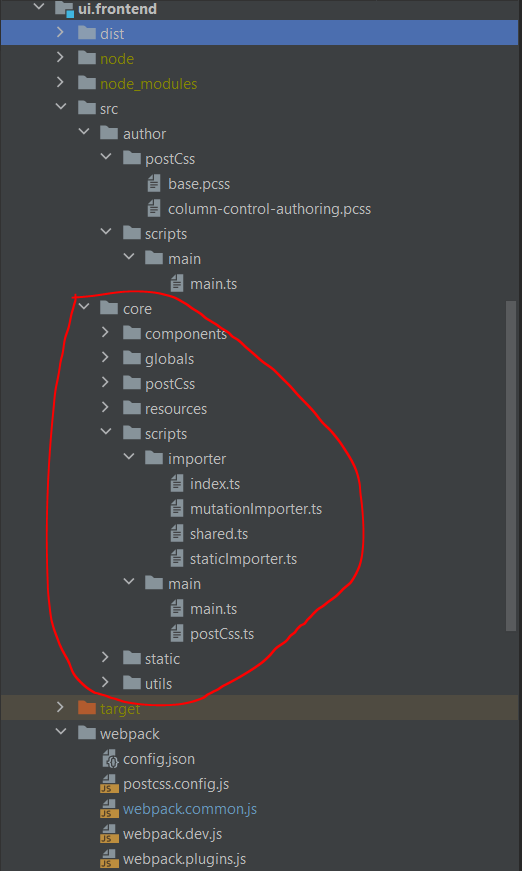
Under ui.apps/src/main/content/jcr_root/apps/flagtick/clientlibs, you can see the defined client libraries (clientlib-base, clientlib-grid, clientlib-dependencies, and clientlib-site). Meanwhile, the ui.frontend module exists as a separate workspace where Webpack compiles assets.
ui.apps holds the clientlib definitions, while ui.frontend handles the build. Webpack compiles the source into the dist folder, and the output is copied into ui.apps so AEM can serve the CSS and JavaScript.

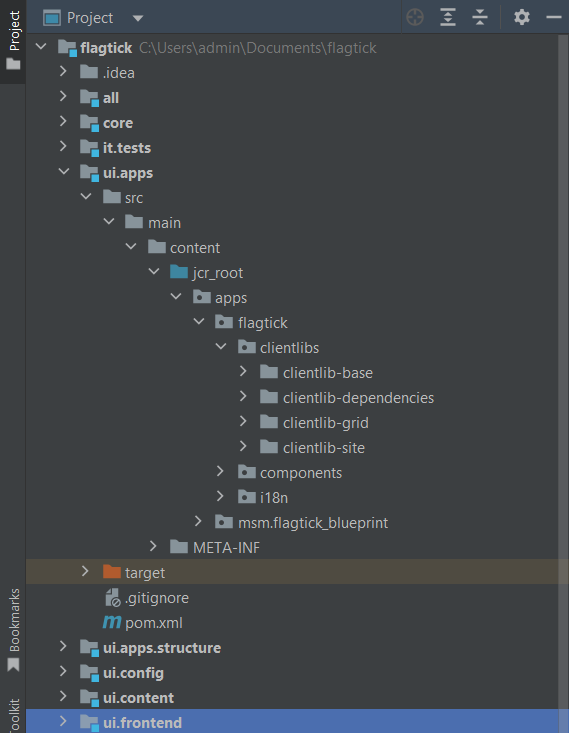
In ui.frontend/src, code can be structured in two ways. The left groups files by type (styles, scripts, resources), while the right groups them by feature (helloworld, login, register, validate). For larger projects, the feature-based approach is easier to manage since each component keeps its JS and SCSS together.
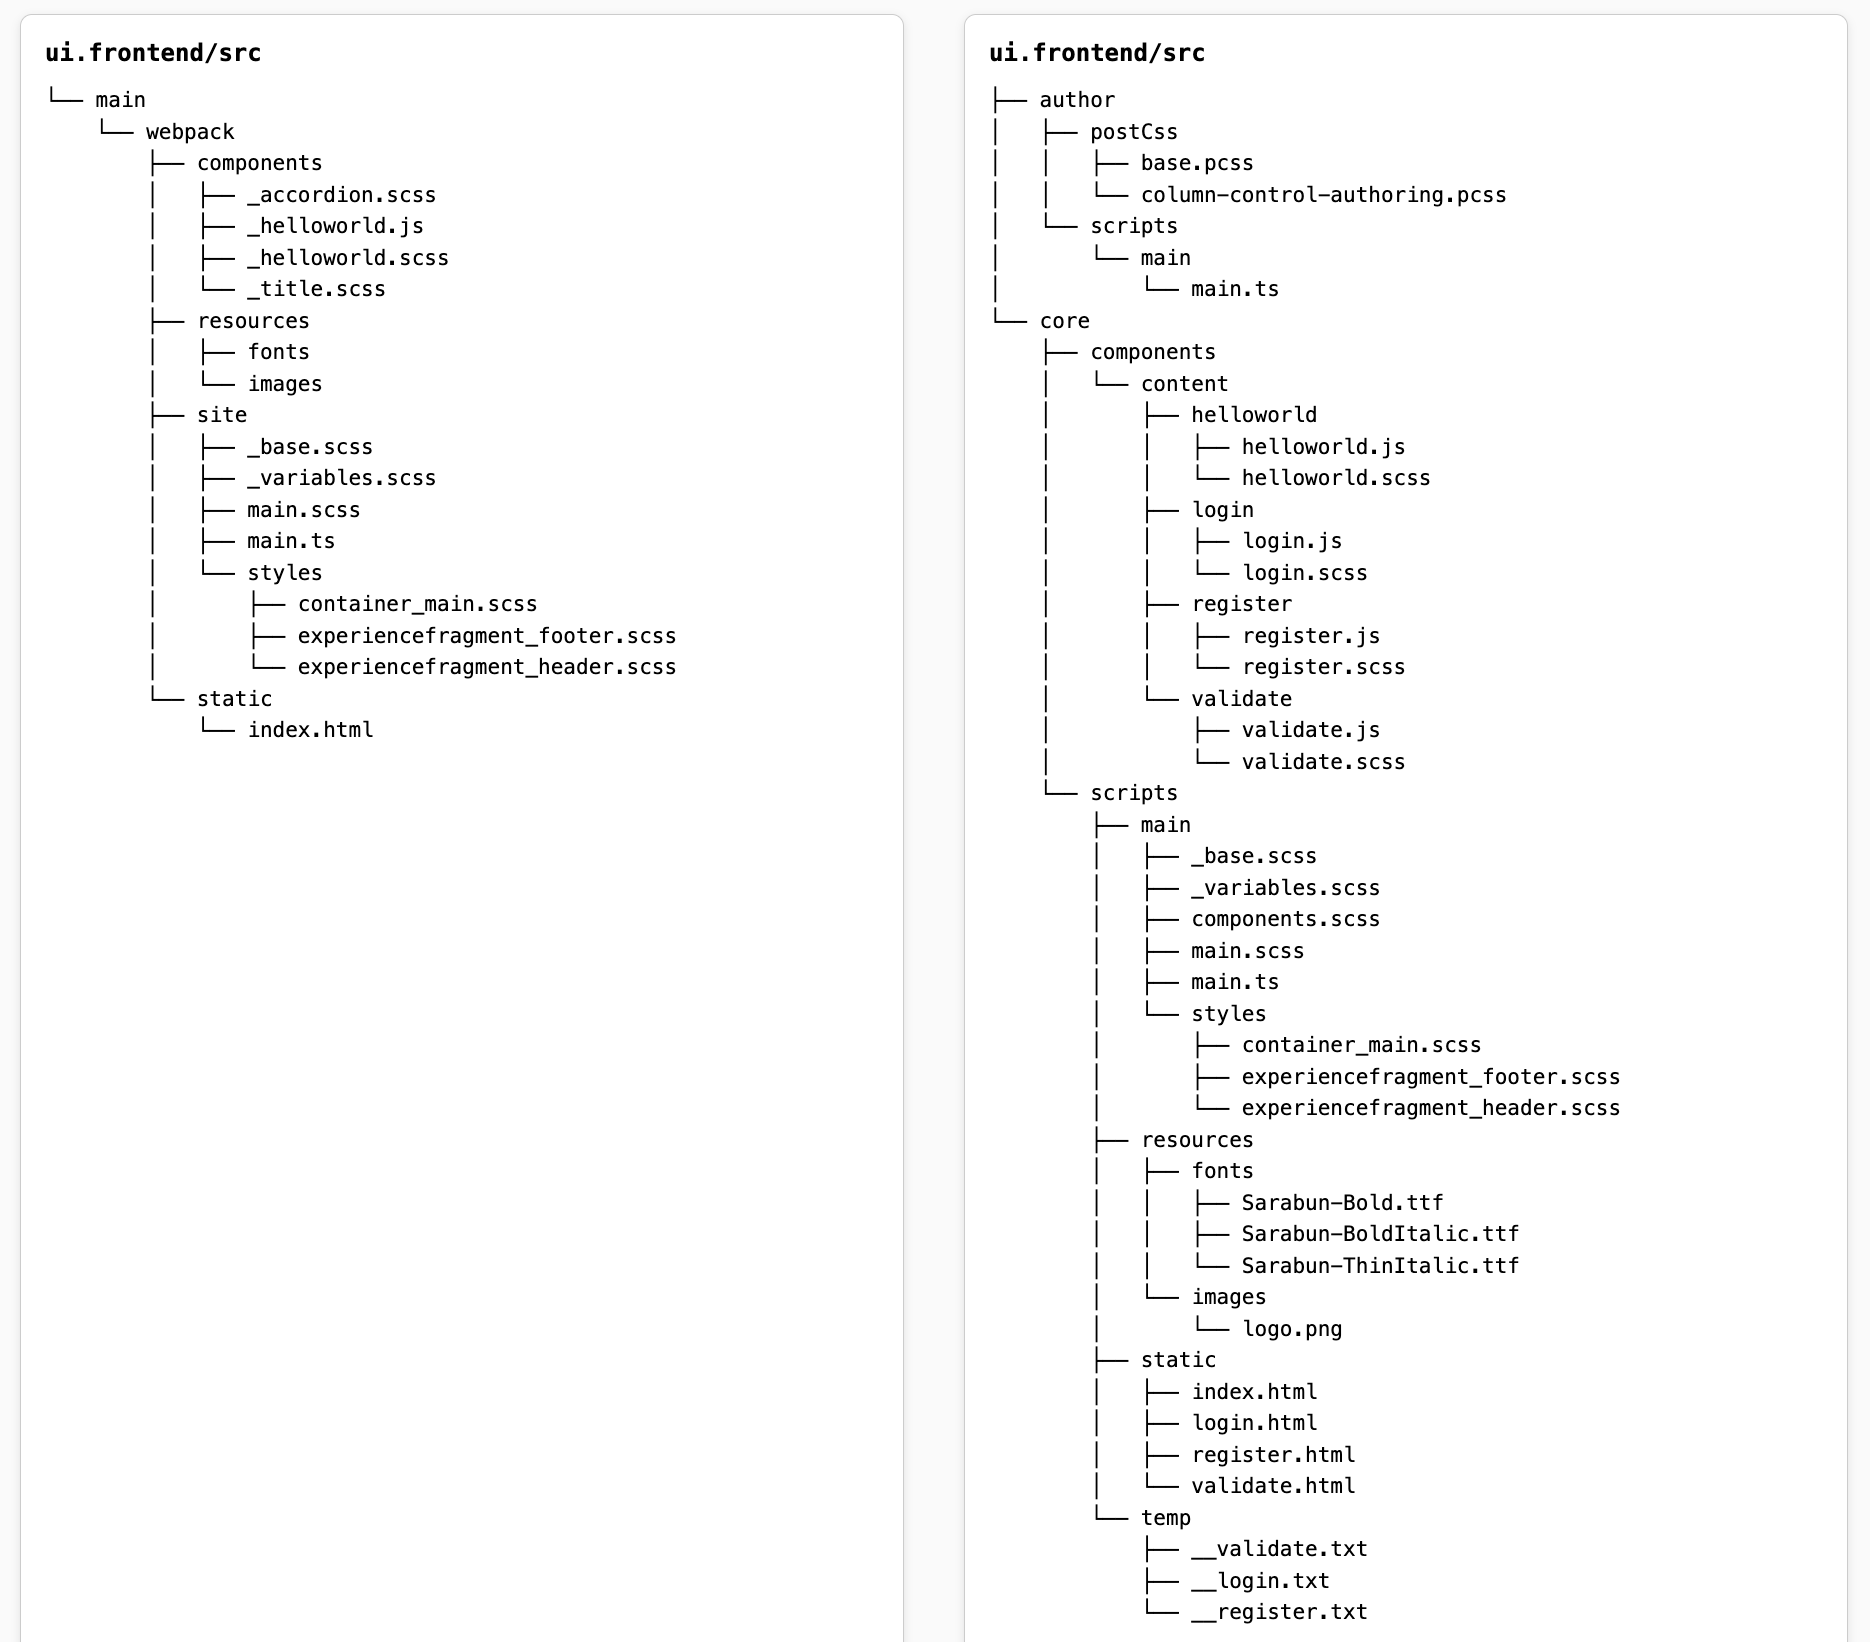
We will now look at how this source structure is applied in practice. In src/core/scripts/main/main.ts, the core folder acts as the entry point for custom code. Here you can define component-specific logic (TypeScript and SCSS/PCSS), reference JavaScript libraries from node_modules, and manage shared assets like fonts, icons, images, and utility classes.
In addition to the core entry point, you can also use the author entry to add custom CSS for AEM authoring interfaces, such as styling the cq-Overlay--component class. For example, the rule in column-control-authoring.pcss adjusts the overlay container display:
// ui.frontend/src/author/postCss/column-control-authoring.pcss

.cq-Overlay--component .cq-Overlay--container {
    display: inline;
}In cases where we need to process .pcss or .scss files, Webpack must be configured with the proper loaders. The next step is to add the following rule to your Webpack configuration:
// ui.frontend/webpack/webpack.common.js
{
    test: /\.pcss$/,
    exclude: /node_modules/,
    use: [
      {
        loader: MiniCssExtractPlugin.loader,
        options: {
          publicPath: config.publicPath,
        }
      },
      {
        loader: 'css-loader',
        options: {
          importLoaders: 1
        },
      },
      {
        loader: 'postcss-loader',
        options: {
          postcssOptions: {
            config: path.resolve(__dirname, 'postcss.config.js'),
          },
        },
      },
    ],
}Since Webpack uses postcss-loader to process .pcss files, the required PostCSS plugins must also be included in your package.json. These plugins handle tasks like nesting, imports, variables, and responsive unit conversion.
» package.json
...
"postcss": "^8.2.15",
"postcss-loader": "^3.0.0",
"postcss-advanced-variables": "^3.0.1",
"postcss-compact-mq": "^0.2.1",
"postcss-extend-rule": "^3.0.0",
"postcss-font-smoothing": "^0.1.0",
"postcss-import": "12.0.1",
"postcss-inline-svg": "^4.1.0",
"postcss-nested": "^4.2.3",
"postcss-nested-ancestors": "^2.0.0",
"postcss-preset-env": "^6.7.0",
"postcss-pxtorem": "^5.1.1",
"postcss-reporter": "^6.0.0",
"postcss-scss": "^3.0.5",
...Besides setting up the PostCSS plugins, you also need to configure Stylelint to handle .pcss files. This ensures consistent coding standards and avoids false errors for custom rules or properties. Add the following configuration to your .stylelintrc.json:
{
  "extends": "stylelint-config-standard",
  "plugins": ["stylelint-order"],
  "rules": {
    "order/properties-alphabetical-order": true,
    "at-rule-no-unknown": [
      true,
      {
        "ignoreAtRules": [
          "each",
          "else",
          "extend",
          "function",
          "if",
          "include",
          "lost",
          "mixin",
          "svg-load"
        ]
      }
    ],
    "property-no-unknown": [
      true,
      {
        "ignoreProperties": [
          "lost-center",
          "lost-column",
          "lost-column-rounder",
          "lost-flex-container",
          "lost-move",
          "lost-row",
          "lost-vars",
          "lost-utility",
          "font-smoothing"
        ]
      }
    ],
    "indentation": [4, { "baseIndentLevel": 0 }],
    "selector-type-no-unknown": [true, { "ignore": ["/^^/"] }],
    "declaration-no-important": false,
    "media-feature-range-operator-space-after": "never"
  }
}After configuring Stylelint, the next step is to set up a postcss.config.js file. This file defines how PostCSS processes your styles, including imports, variables, nesting, and optimizations. Below is an example configuration aligned with the plugins declared in package.json:
// postcss.config.js
const postCssSCSS = require('postcss-scss');
const path = require('path');

const paths = {
    components: path.resolve(__dirname, '../src/core/components/'),
    icons: path.resolve(__dirname, '../src/core/resources/icons/'),
    modules: path.resolve(__dirname, '../node_modules/'),
};

module.exports = {
    syntax: postCssSCSS,
    plugins: [
        ['postcss-import', { path: [`${paths.components}`, `${paths.modules}`] }],
        'postcss-advanced-variables',
        'postcss-font-smoothing',
        'postcss-nested-ancestors',
        'postcss-nested',
        'postcss-compact-mq',
        ['postcss-preset-env', { browsers: 'last 2 versions' }],
        'lost',
        ['cssnano', {
            preset: ['default', {
                normalizeWhitespace: false,
                discardComments: { removeAll: true }
            }]
        }],
        ['postcss-inline-svg', { paths: [`${paths.icons}`], removeFill: true }],
        ['postcss-extend-rule', { onRecursiveExtend: 'throw', onUnusedExtend: 'throw' }],
        ['postcss-pxtorem', { propList: ['*'] }],
        'postcss-reporter'
    ],
};Then, run npm run dev to verify the setup. This will start the aem-clientlib-generator and show the clientlibs being processed, for example: clientlib-site.
...
start aem-clientlib-generator
...
processing clientlib: clientlib-siteIII. Extending Client Libraries Configuration
After verifying the build process with npm run dev, the next step is to extend the workflow by defining additional client libraries. The aem-clientlib-generator already handles base libraries like clientlib-site, but larger projects often need separate libraries for authoring, dialog styles, or dynamic modules.
By updating the configuration file, you can create purpose-specific bundles that are easy to maintain and deploy. For example:
clientlib-dynamic-modules– scripts and assets for dynamic page modulesclientlib-author– custom styles for the AEM authoring interfaceclientlib-author-dialog– assets for component dialogs in Touch UI
Below is an example of how to extend your clientlib.config.js with these definitions:
{
  ...libsBaseConfig,
  name: 'clientlib-dynamic-modules',
  ...
},
{
  ...libsBaseConfig,
  name: 'clientlib-author',
  ...
},
{
  ...libsBaseConfig,
  name: 'clientlib-author-dialog',
  ...
}Now let us extend the clientlib-author-dialog to include both JavaScript and CSS files. This setup allows you to manage custom behaviors and styles directly within AEM authoring dialogs.
{
  ...libsBaseConfig,
  name: 'clientlib-author-dialog',
  categories: ['cq.authoring.dialog.all'],
  dependencies: [],
  assets: {
    js: {
      cwd: 'clientlib-author-dialog',
      files: ['**/*.js'],
      flatten: true
    },
    css: {
      cwd: 'clientlib-author-dialog',
      files: ['**/*.css'],
      flatten: false
    },
  }
}In practice, there are two ways to generate the clientlib-author-dialog. The first is through the automated build process using clientlib.config.js and running npm run dev, which pushes the generated clientlib into ui.apps. The second is to create it manually in the source code under /apps/<project>/clientlibs/ for projects that don’t use a front-end build pipeline.
In a typical AEM project, this setup is often used to handle authoring interactions — for example, showing or hiding dialog fields based on a checkbox selection. The folder structure for such logic might look like this:
ui.apps
└── src
    └── main
        └── content
            └── jcr_root
                └── apps
                    └── flagtick
                        └── clientlibs
                            └── clientlib-author-dialog
                                ├── js
                                │   └── checkboxshowhide.js
                                ├── .content.xml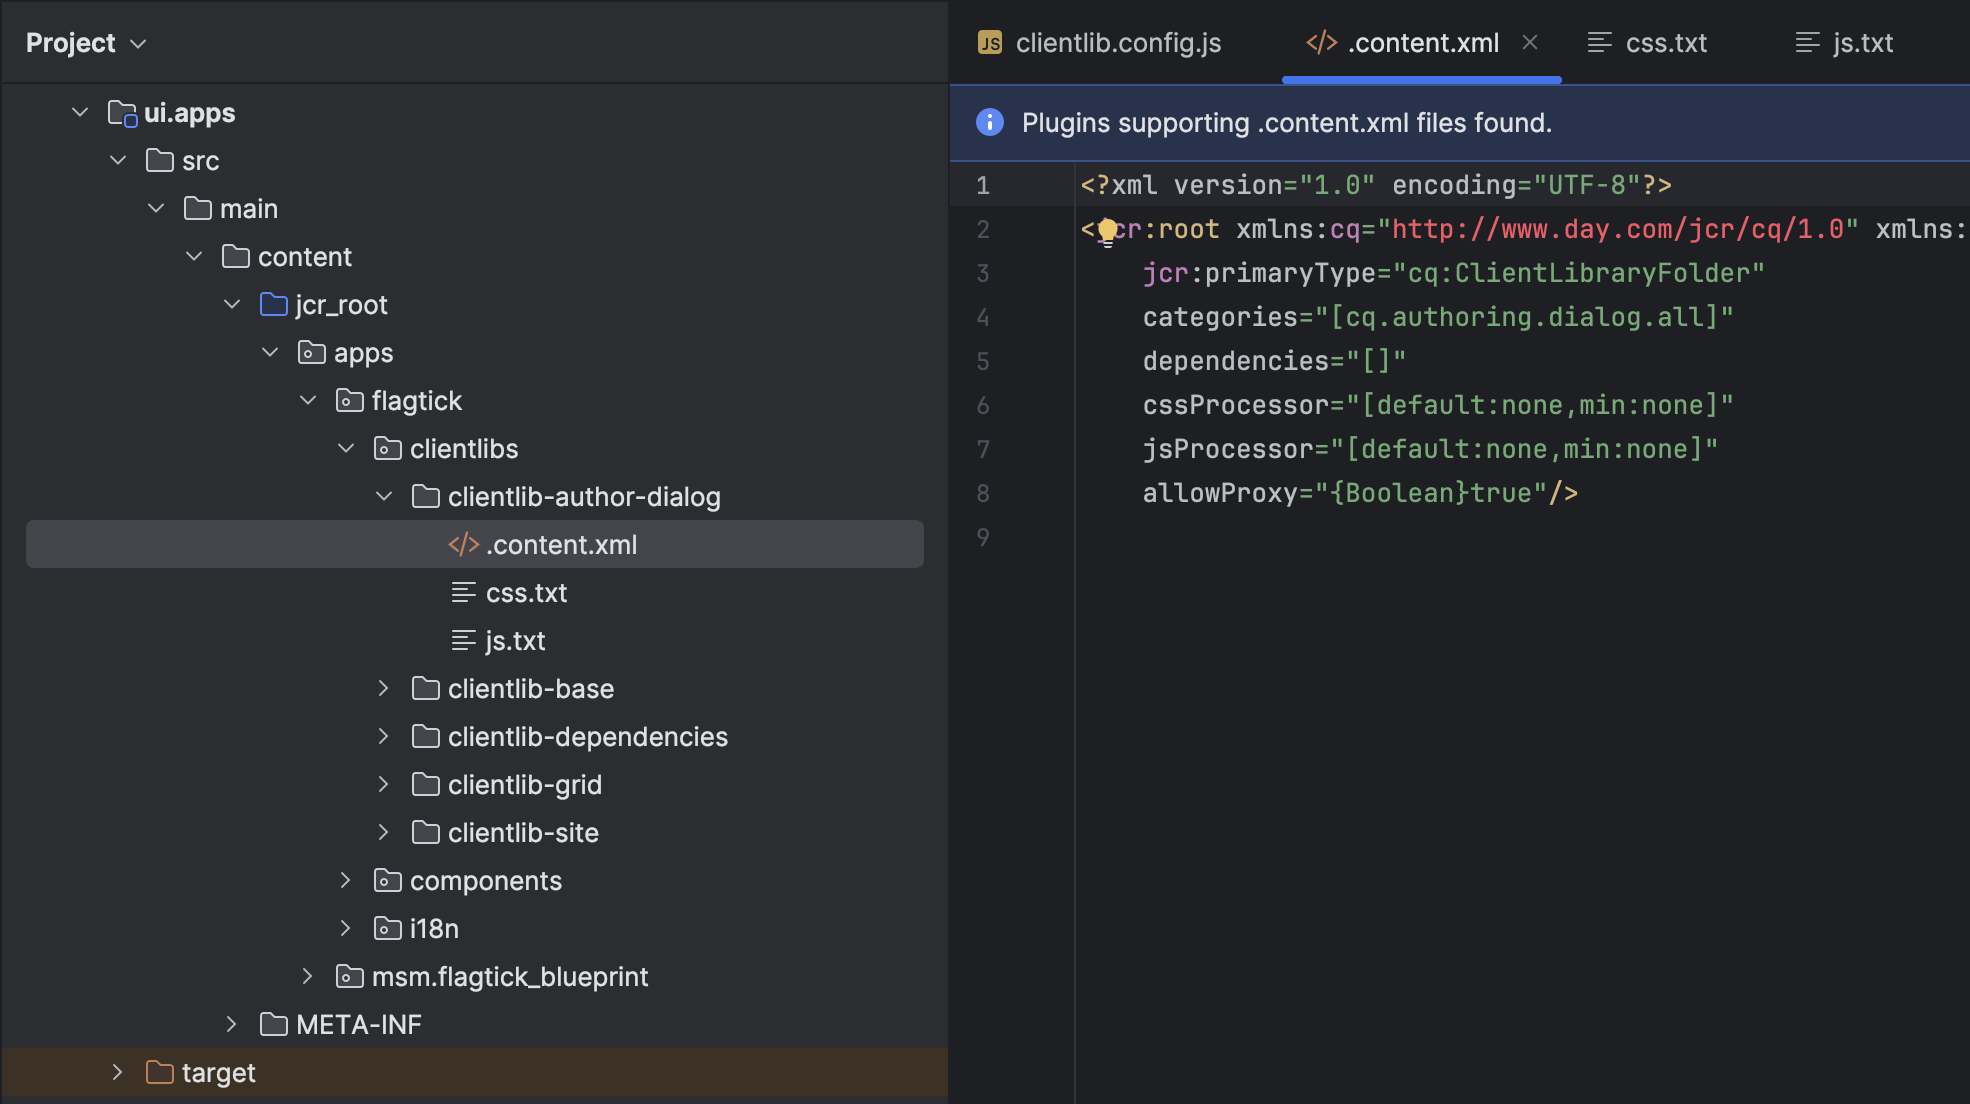
└── js.txtNote:
The .content.xml file with categories="[cq.authoring.dialog.all]" registers this client library to be loaded across all Touch UI dialogs in AEM’s Author mode.
On the other hand, if you want the client library to load only for a specific component’s dialog, replace the generic cq.authoring.dialog.all with a component-specific category in the format cq.authoring.dialog.<componentName>.
ui.apps
└── src
    └── main
        └── content
            └── jcr_root
                └── apps
                    └── flagtick
                        ├── clientlibs
                        │   ├── clientlib-author
                        │   ├── clientlib-base
                        │   ├── clientlib-dependencies
                        │   ├── clientlib-grid
                        │   └── clientlib-site
                        └── components
                            ├── ...
                            └── helloworld
                                ├── _cq_dialog
                                ├── clientlib-author-dialog
                                │   ├── js
                                │   │   └── mycustom.js
                                │   ├── .content.xml
                                │   └── js.txt
                                ├── .content.xml
└── helloworld.htmlIn cases where you need to apply custom JavaScript or CSS logic to the Content Fragment Model editor UI, especially when working with core data types that lack extended configuration or variant options, you should include the clientlib-author.
This allows you to style or extend authoring behaviors directly within the AEM Author interface.
//clientlib.config.js
{
  ...libsBaseConfig,
  name: 'clientlib-author',
  categories: ['flagtick.author'],
  dependencies: [],
  assets: {
    css: {
      cwd: 'clientlib-author',
      files: ['**/*.css'],
      flatten: false
    },
  }
},Beyond author styling, you can create client libraries for dynamic or feature-specific scripts. These handle JavaScript that runs only in certain contexts, like lazy-loaded widgets or interactive components. Below is a sample clientlib-dynamic-modules setup for bundling such scripts separately from the main build.
//clientlib.config.js
{
  ...libsBaseConfig,
  name: 'clientlib-dynamic-modules',
  categories: ['flagtick.site.dynamic-modules'],
  dependencies: [],
  assets: {
    resources: [
      "clientlib-dynamic-modules/resources/*.js"
    ]
  },
}Integrating Client Libraries into the Webpack
To better integrate AEM’s client libraries with Webpack during development, we use HtmlWebpackPlugin to inject built assets into a base HTML file (index.html). This mimics how AEM loads CSS/JS from clientlibs via cq:clientLibraryFolder.
✳️ Why This Matters
By managing your index.html within Webpack (instead of AEM), you can:
- Use hot-reloading during front-end dev
- Emulate AEM component structure in standalone dev mode
- Inject compiled JS/CSS automatically
//webpack.dev.js
plugins: [
    new HtmlWebpackPlugin({
        template: path.resolve(__dirname, SOURCE_ROOT + '/static/index.html'),
        filename: 'index.html',
        chunks: ['site', 'author']
    }),
    new HtmlWebpackPlugin({
        template: path.resolve(__dirname, SOURCE_ROOT + '/static/login.html'),
        filename: 'login.html',
        chunks: ['site', 'author']
    }),
    new HtmlWebpackPlugin({
        template: path.resolve(__dirname, SOURCE_ROOT + '/static/register.html'),
        filename: 'register.html',
        chunks: ['site', 'author']
    }),
    new HtmlWebpackPlugin({
        template: path.resolve(__dirname, SOURCE_ROOT + '/static/validate.html'),
        filename: 'validate.html',
        chunks: ['site', 'author']
    })
],Note: The site and author chunks come from the dist folder, built through AEM’s Webpack setup. They correspond to clientlib-site and clientlib-author, and are automatically appended to the HTML output.
Once these templates are configured, the Webpack setup can automatically compile and inject client libraries into the appropriate HTML entry points.
To streamline this process, we define a set of NPM scripts to handle different build modes — including development, production, and clientlib synchronization with AEM.
"scripts": {
  "dev": "webpack --mode development --color --env dev --config webpack/webpack.dev.js && clientlib --verbose",
  "prod": "webpack --mode production --color --env prod --config webpack/webpack.prod.js && clientlib --verbose",
  "clientlibs": "clientlib --verbose",
  "start": "webpack-dev-server --open --config webpack/webpack.dev.js",
  "sync": "aemsync -d -p ../ui.apps/src/main/content",
  "analyzeBundle": "webpack-bundle-analyzer --port 4200 ./dist/stats.json",
  "chokidar": "chokidar -c \"clientlib\" ./dist",
  "aemsyncro": "aemsync -w ../ui.apps/src/main/content",
  "watch": "npm-run-all --parallel start chokidar aemsyncro"
},After setting up the Webpack build scripts, the next step is to configure PostCSS to handle modular AEM components.
Creating a dedicated postcss.config.js helps manage component-level CSS and JS (TypeScript) while keeping your front-end structure clean and scalable.
//postcss.config.js
const postCssSCSS = require('postcss-scss');
const path = require('path');

const paths = {
    components: path.resolve(__dirname, '../src/core/components/'),
    icons: path.resolve(__dirname, '../src/core/resources/icons/'),
    modules: path.resolve(__dirname, '../node_modules/'),
};
...AEM front-end projects typically include a config.json file that defines the core build paths used by Webpack, PostCSS, and the AEM clientlib generator. This file acts as a central reference for mapping front-end output (/dist) to the corresponding AEM clientlibs and component folders inside /ui.apps.
AEM Front-End Path Mapping
- Source structure:
/src/core/or/src/author/ - Generated assets:
/dist/clientlib-site/or/dist/clientlib-author/ - AEM clientlibs (deployed):
/apps/flagtick/clientlibs/→/etc.clientlibs/flagtick/clientlibs/
Once these mappings are configured, AEM automatically maps the generated clientlib-site and clientlib-author assets from /dist to their deployed paths under /etc.clientlibs. This ensures all HTML references resolve correctly on both author and publish instances.
<link rel="stylesheet" href="/etc.clientlibs/flagtick/clientlibs/clientlib-base.css" type="text/css">
<script type="text/javascript" src="/etc.clientlibs/flagtick/clientlibs/clientlib-dependencies.js"></script>
<link rel="stylesheet" href="/etc.clientlibs/flagtick/clientlibs/clientlib-dependencies.css" type="text/css">In practice, the ui.apps module in AEM doesn’t handle asset logic like fonts or images — it only stores the compiled clientlibs. The actual asset processing and bundling happen in ui.frontend.
Therefore, the stats.json file becomes an essential reference for verifying how Webpack maps, bundles, and outputs these assets for each site’s client library.
// main.scss
@font-face {
font-family: SarabunRegular;
src: url('../resources/fonts/Sarabun-Regular.ttf');
}
// stats.json
{
"type": "asset",
"name": "clientlib-site/fonts/Sarabun-Regular.ttf",
"size": 83080,
"emitted": true,
"comparedForEmit": false,
"cached": false,
"info": {
"copied": true,
"sourceFilename": "src/core/scripts/resources/fonts/Sarabun-Regular.ttf",
"size": 83080
},
"chunkNames": [],
"chunkIdHints": [],
"auxiliaryChunkNames": [],
"auxiliaryChunkIdHints": [],
"related": {},
"chunks": [],
"auxiliaryChunks": [],
"isOverSizeLimit": false
},Next step is to run npm start to test how AEM’s proxy serves assets from the /dist folder. This confirms that compiled CSS, JS, and static files resolve correctly through /etc.clientlibs during local development.
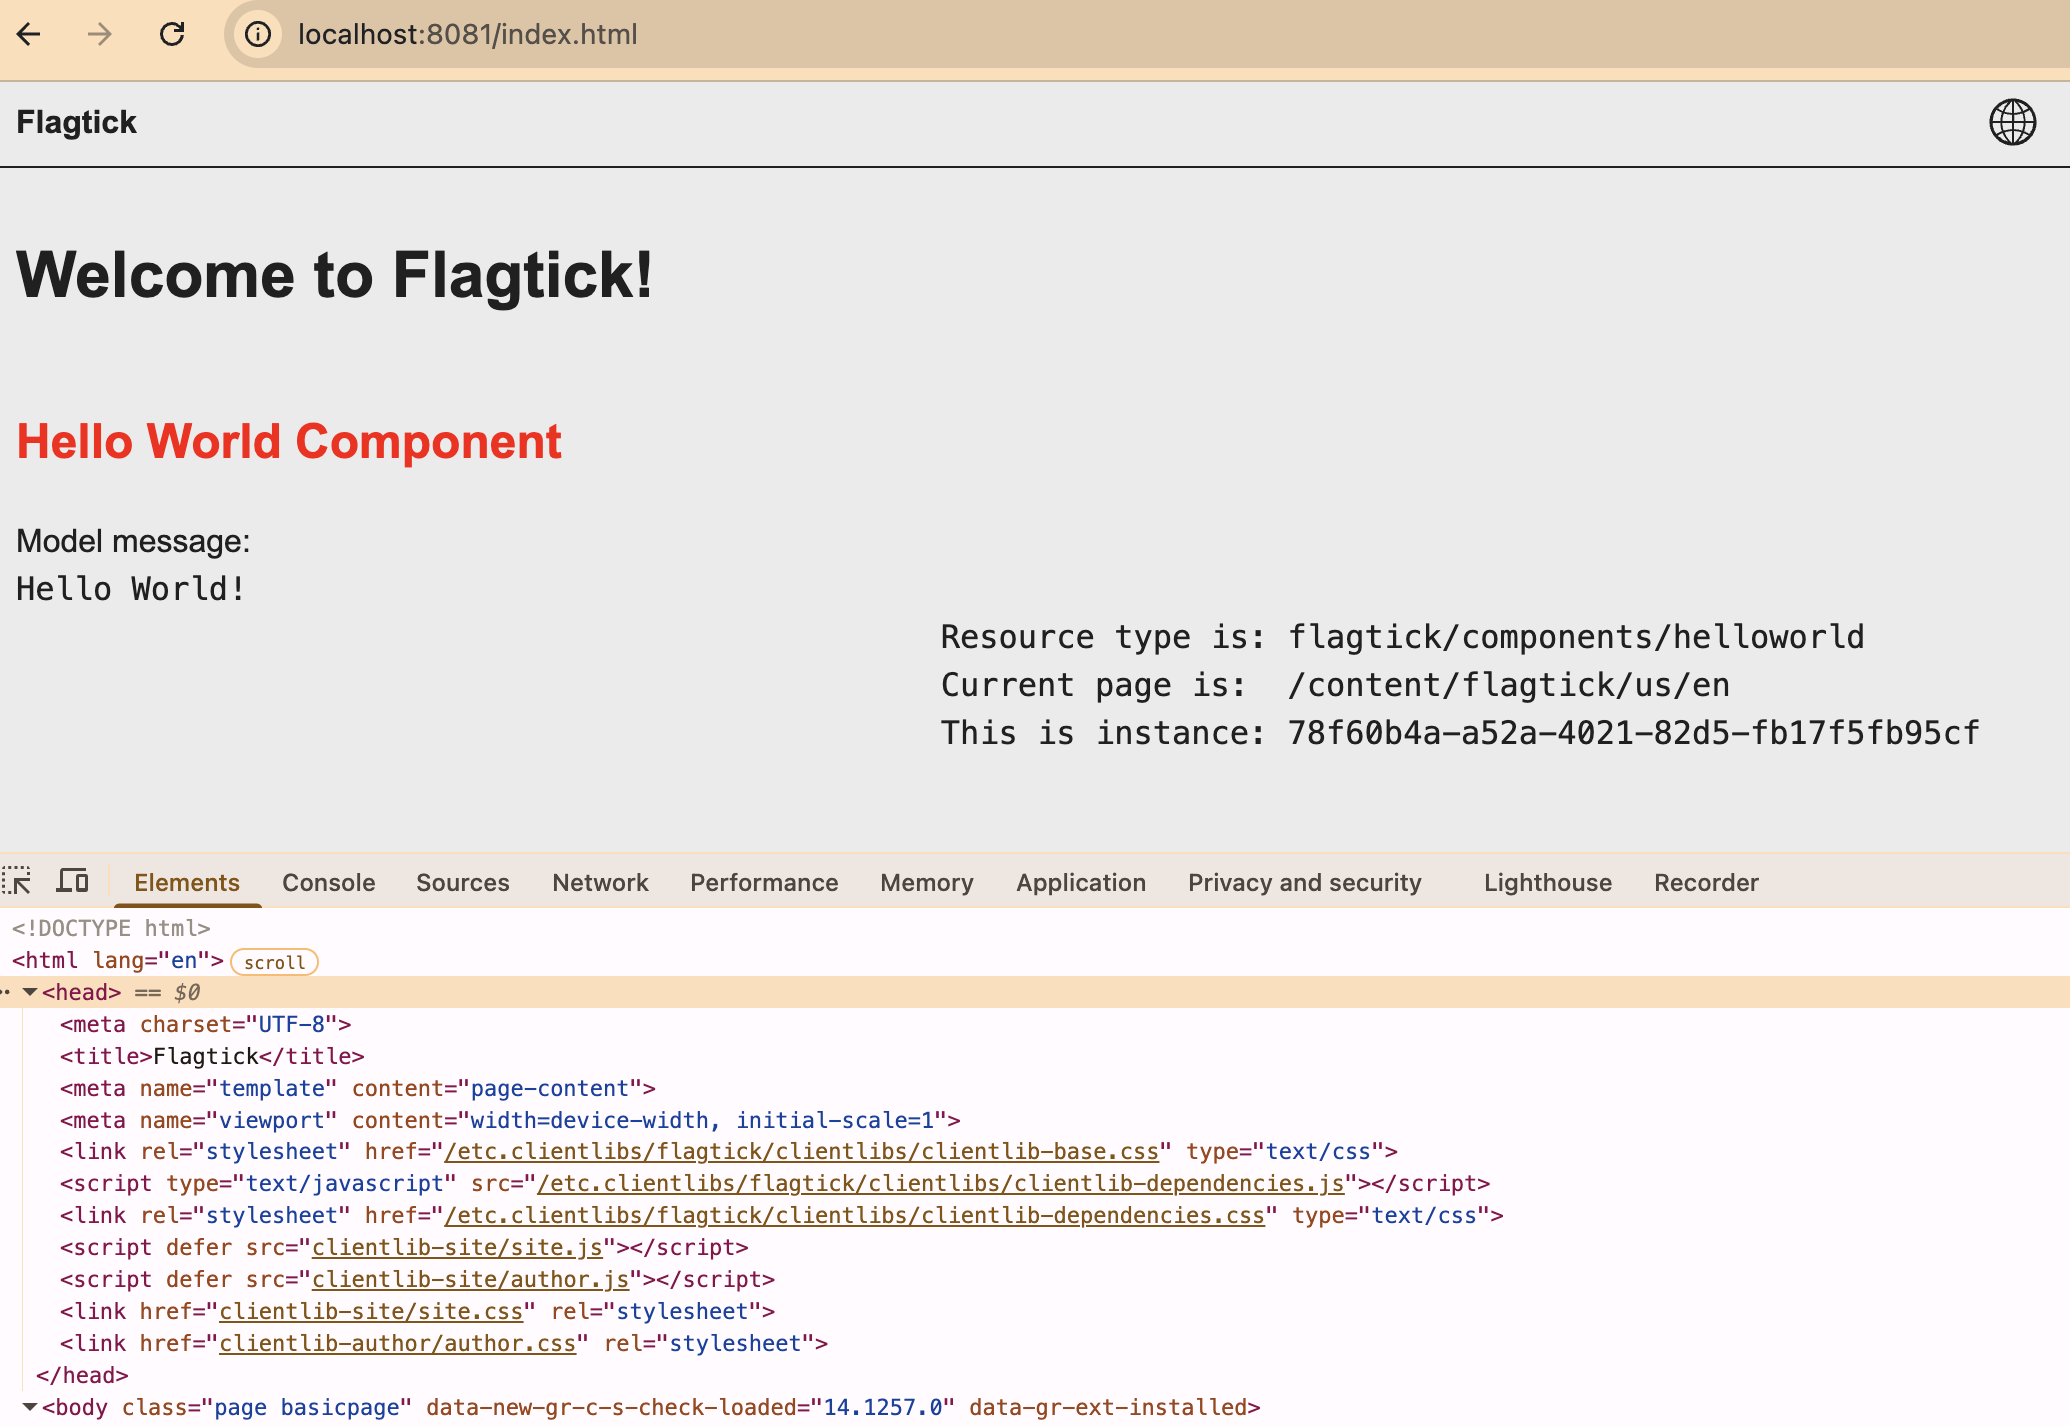
npm startWhen you start the local development server, AEM serves the index.html file from the static folder as the default entry point.
<head>
<meta charset="UTF-8"/>
<title>Flagtick</title>
<meta name="template" content="page-content"/>
<meta name="viewport" content="width=device-width, initial-scale=1"/>
<link rel="stylesheet" href="/etc.clientlibs/flagtick/clientlibs/clientlib-base.css" type="text/css">
<script type="text/javascript" src="/etc.clientlibs/flagtick/clientlibs/clientlib-dependencies.js"></script>
<link rel="stylesheet" href="/etc.clientlibs/flagtick/clientlibs/clientlib-dependencies.css" type="text/css">
</head>As you can see here, the output is generated based on the chunks ['site', 'author'], which produce the additional clientlibs shown in the screenshot above. If you look at the DOM, you can see how these bundles are mapped and loaded automatically.
When you run npm start, Webpack (configured through the AEM archetype) does the following:
- Copies all assets under
resources/(fonts, images, etc.) into the final/distoutput bundle. - Each file’s mapping is recorded in
stats.json, so AEM knows thatresources/images/logo.png → clientlib-site/images/logo.png
This mapping defines where the file is served from when proxied through AEM’s local dispatcher or/etc.clientlibs/in Cloud Manager.
<ul class="cmp-navigation__group">
    <li class="cmp-navigation__item cmp-navigation__item--level-0 cmp-navigation__item--active">
        <a href="/content/flagtick/us/en.html" title="Flagtick" aria-current="page" class="cmp-navigation__item-link">Flagtick</a>
        <img src="/clientlib-site/images/logo.png" alt="logo"/>
    </li>
</ul>Wrapping up
You have now validated how the AEM front-end build works locally—fonts, styles, and scripts are bundled, mapped through /etc.clientlibs, and served via the AEM proxy just like in Cloud Manager. From verifying stats.json to inspecting the DOM and confirming asset paths, your front-end pipeline is now aligned with Adobe’s Cloud standards.
If something doesn’t render correctly, check stats.json first—missing entries usually mean that the asset wasn’t emitted during the build. Once everything maps correctly, you’re ready to move beyond local testing and ensure those optimizations are reflected in AEM’s ui.apps layer, where authors can drag and drop components from the blueprint and see your front-end updates in action.
What’s next
In the next guide, we’ll move from front-end asset mapping to AEM page structure — turning your static index.htmlinto a fully editable AEM page. You’ll learn how to:
- Map static HTML layouts to AEM templates and components.
- Configure template types, page policies, and allowed components.
- Extend core page components with custom header and footer libraries.
- Introduce Experience Fragments for reusable design sections.
By the end, you’ll understand how the static markup served from ui.frontend connects directly to editable templates within AEM — bridging design and authoring in a real-world setup.
👉 Continue reading: From HTML Mockups to Editable AEM Pages