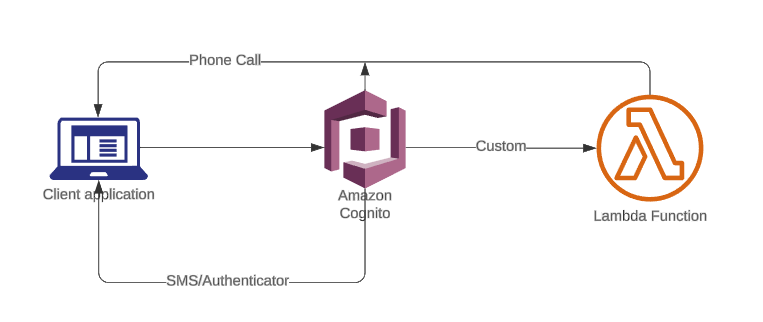
Add Voice Call OTP to Cognito Using Amazon Connect
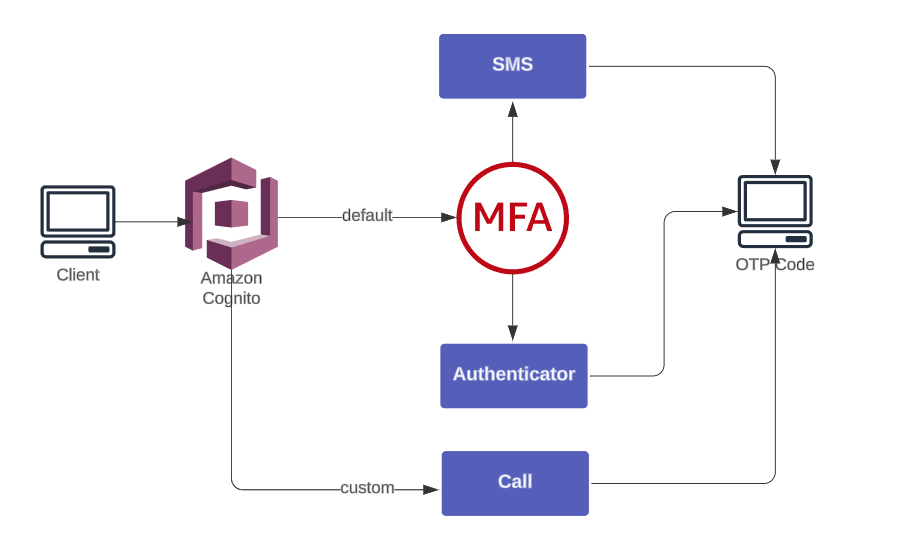
Amazon Cognito supports MFA through SMS and Authenticator Apps—but not voice calls.
To add phone-call OTP delivery without third-party vendors, we use:
- Amazon Connect → place automated outbound calls
- AWS Lambda → generate OTP + invoke Connect
- Cognito Custom Auth Flow → verify OTP
This guide shows the complete AWS-native implementation.
Setting up outbound voice flows with Amazon Connect
Most AWS accounts allow immediate access to Connect, but some require contacting AWS Support.
If Connect is not available, open a Support ticket to request activation.
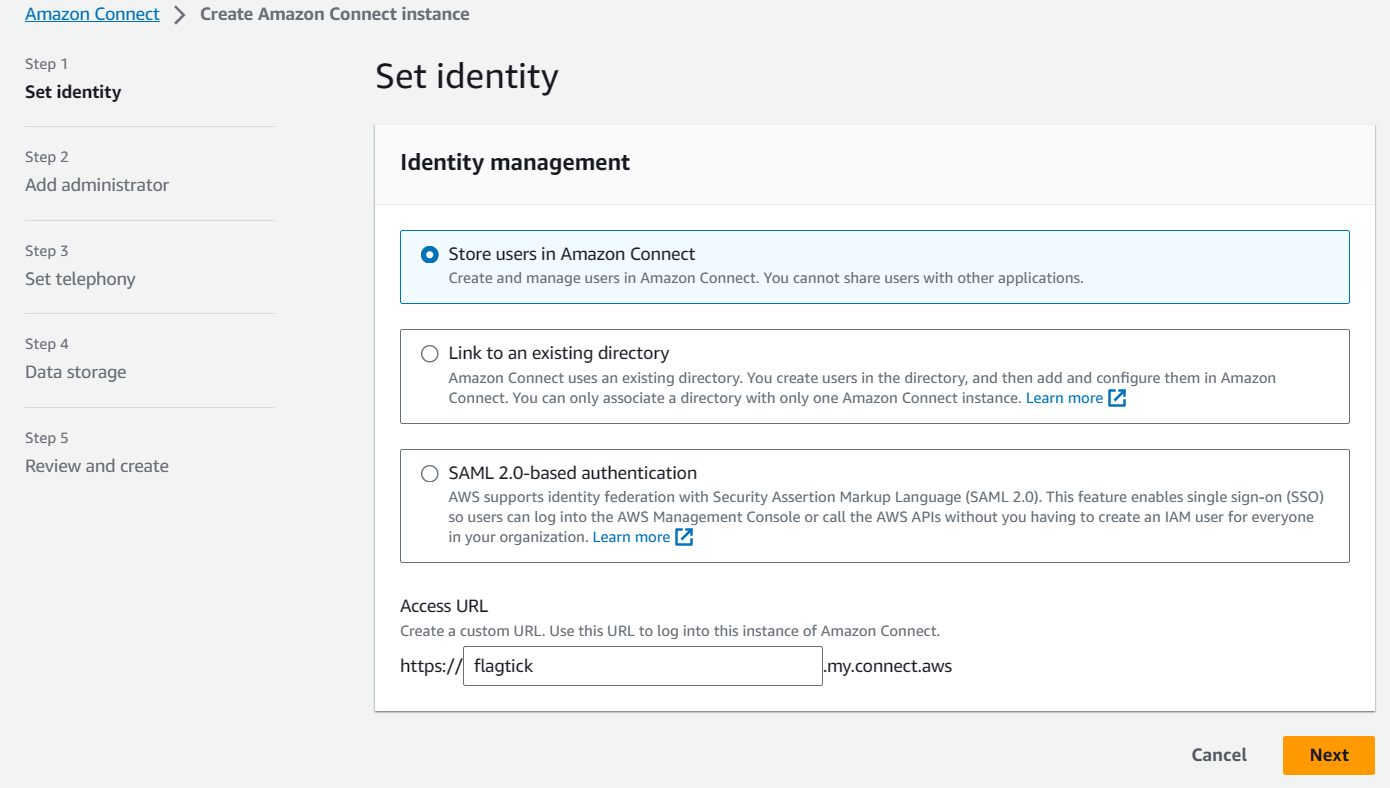
During setup, start by creating your Amazon Connect instance.
- Choose Store users in Amazon Connect.
- Provide a custom URL (optional).
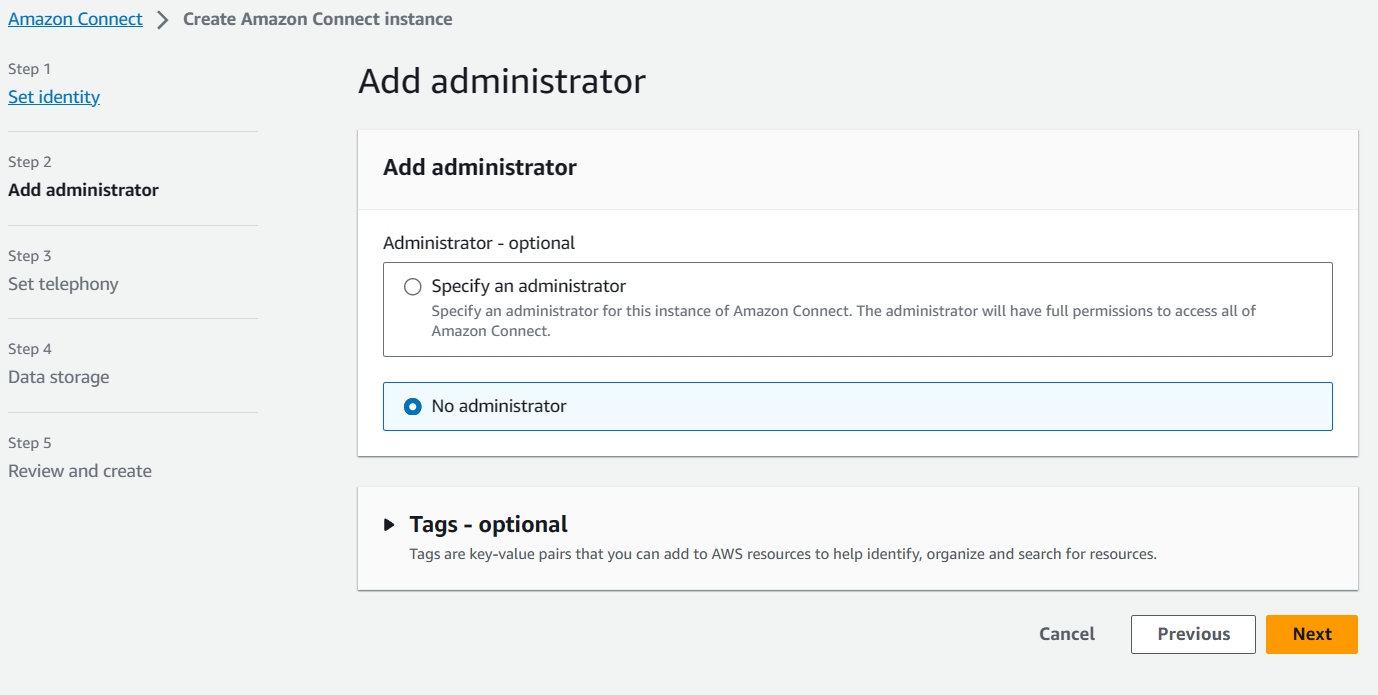
- Add at least one administrator.
Tip: If you run issues you can’t resolve, check Service Quotas or open a support ticket with AWS Support.
At Step 2, you must add an admin who can manage contact flows:
Once the instance is ready, collect these identifiers:
- Instance ID
- Contact Flow ID
- Claimed (source) phone number
- User phone number (destination)
Example CLI reference:
start-outbound-voice-contact
[--name <value>]
[--description <value>]
[--references <value>]
[--related-contact-id <value>]
--destination-phone-number <value>
--contact-flow-id <value>
--instance-id <value>
[--client-token <value>]
[--source-phone-number <value>]
[--queue-id <value>]
[--attributes <value>]
[--answer-machine-detection-config <value>]
[--campaign-id <value>]
[--traffic-type <value>]
[--cli-input-json <value>]
[--generate-cli-skeleton <value>]
[--debug]
[--endpoint-url <value>]
[--no-verify-ssl]
[--no-paginate]
[--output <value>]
[--query <value>]
[--profile <value>]
[--region <value>]
[--version <value>]
[--color <value>]
[--no-sign-request]
[--ca-bundle <value>]
[--cli-read-timeout <value>]
[--cli-connect-timeout <value>]AWS docs: https://docs.aws.amazon.com/cli/latest/reference/connect/start-outbound-voice-contact.html
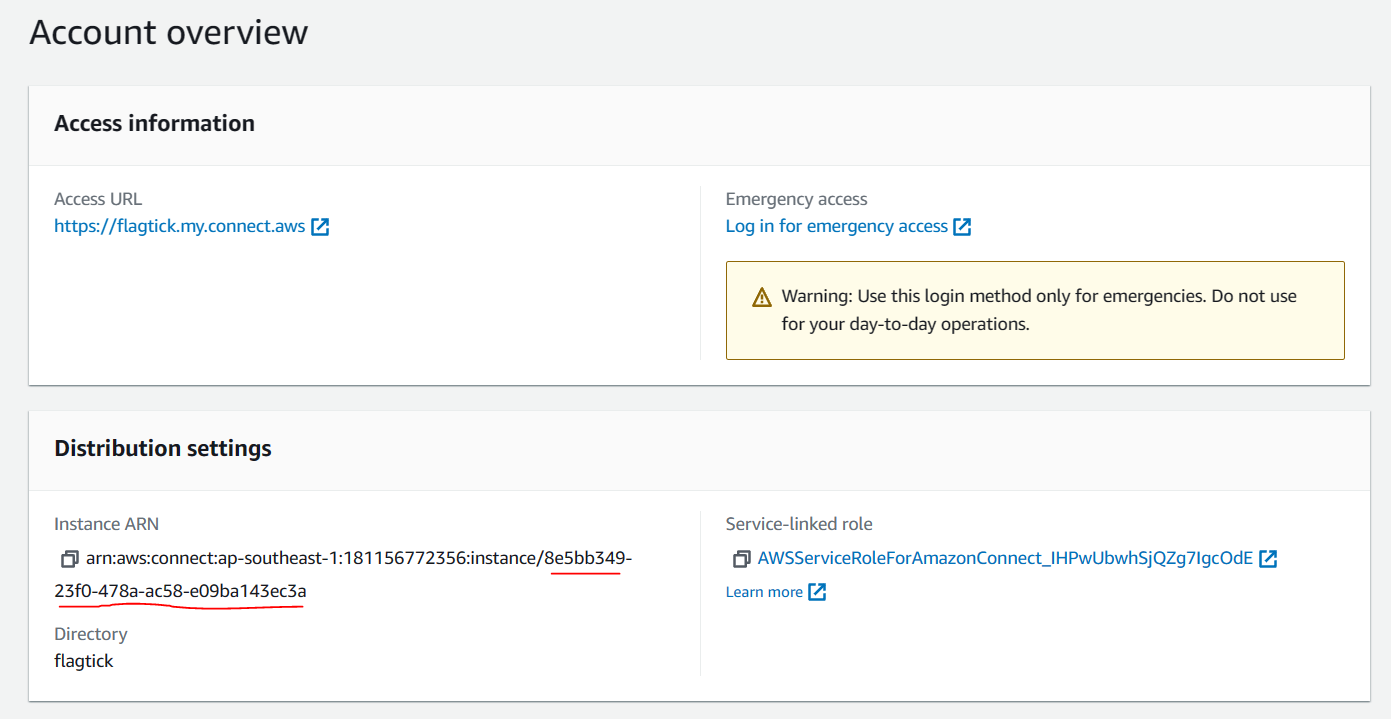
If you signed up with No Administrator, use emergency login:
https://flagtick.my.connect.aws/home
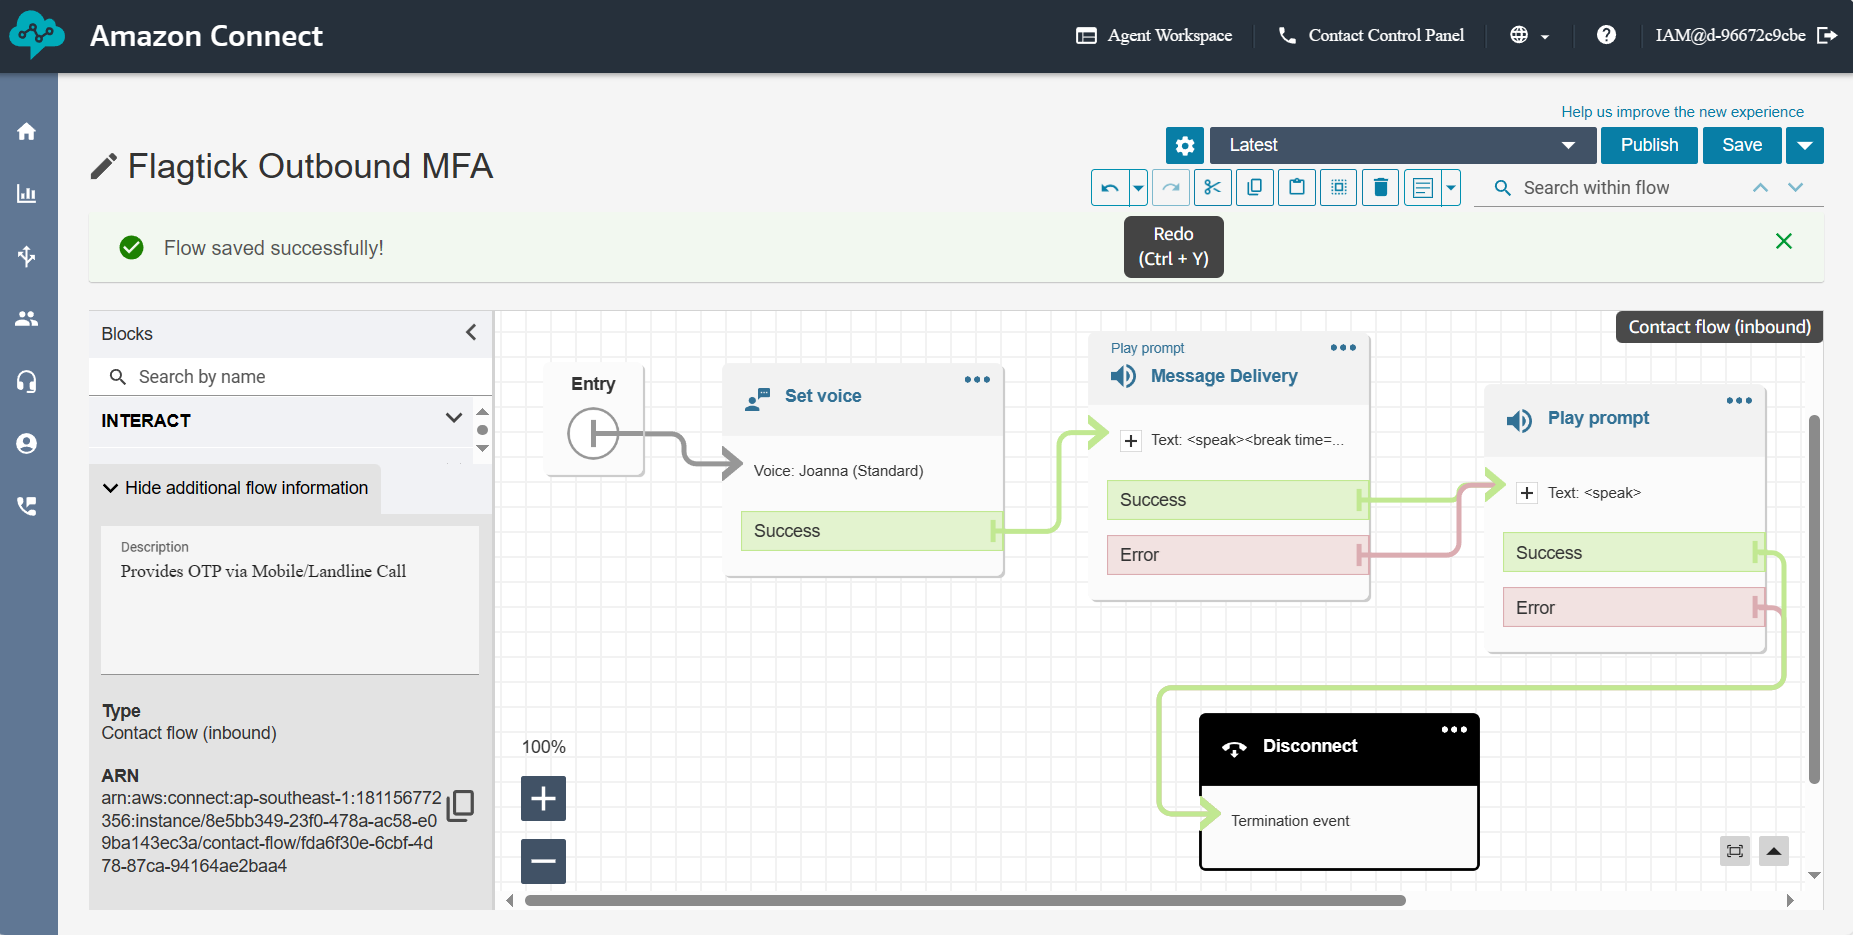
Example contact flow ID from screenshot:
fda6f30e-6cbf-4d78-87ca-94164ae2baa4Next, create the Outbound Voice Contact Flow.
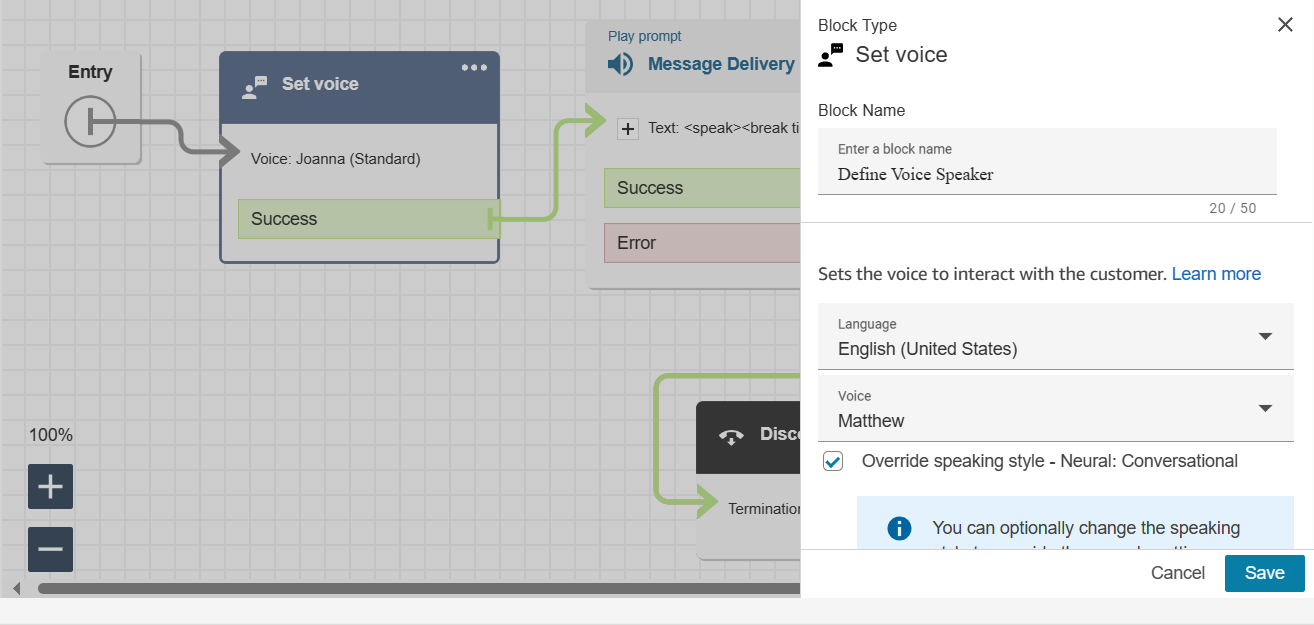
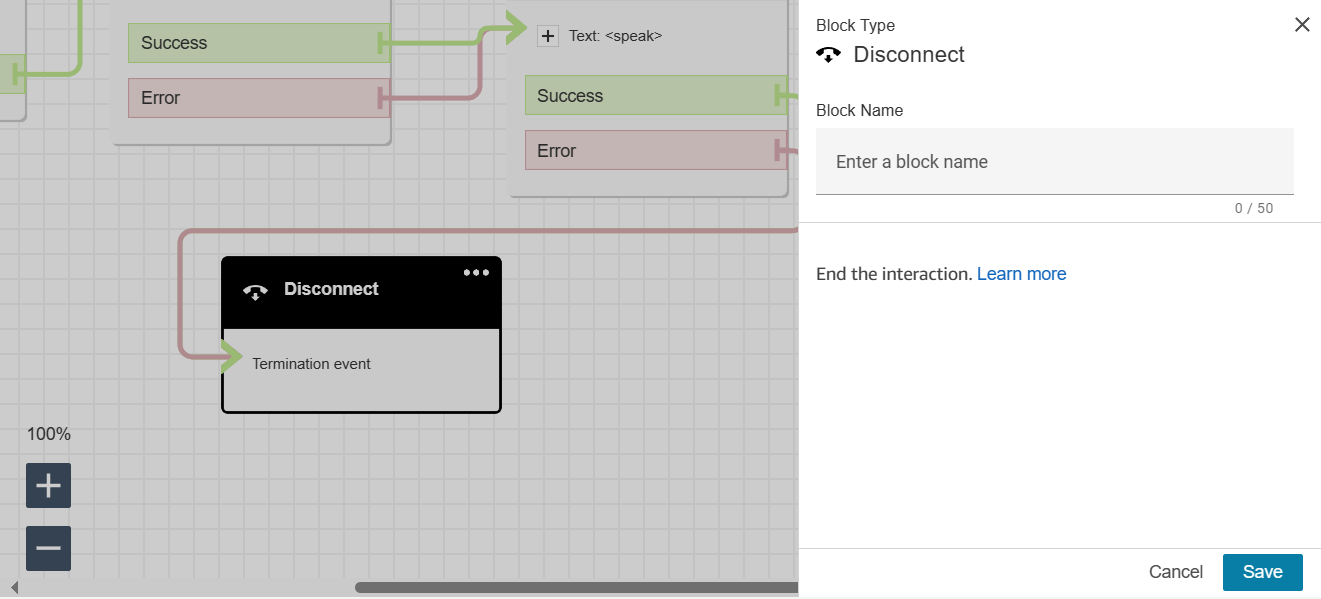
Set Voice — choose voice + language
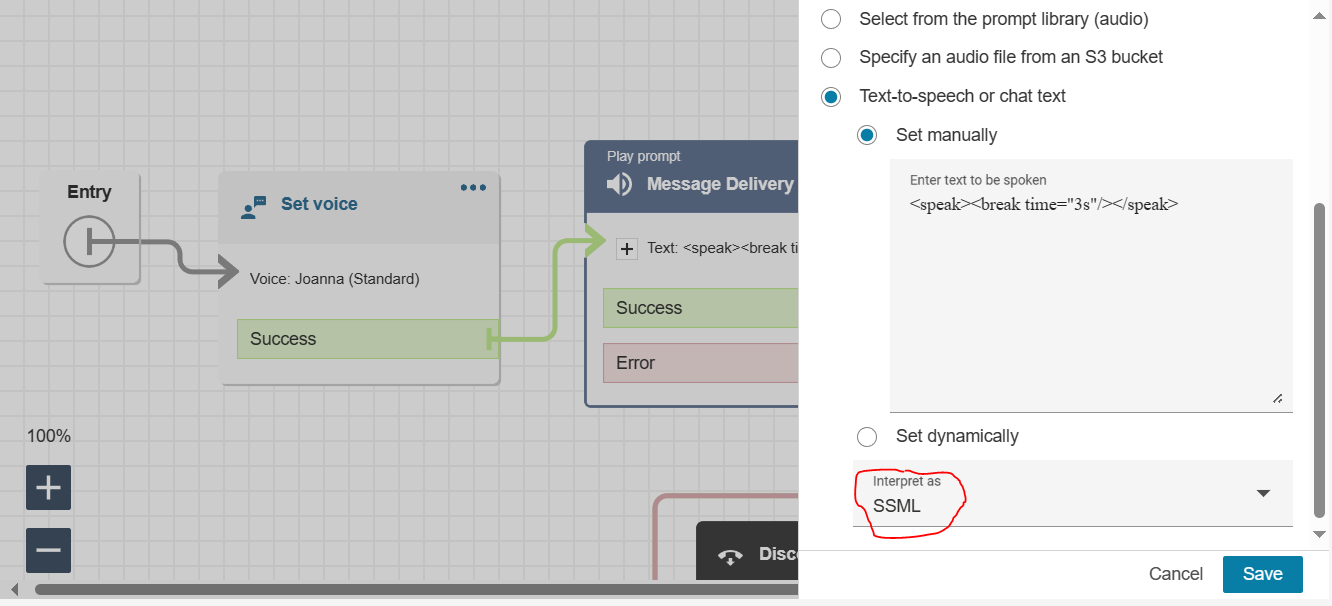
Message Delivery — supports SSML for natural speech tuning
Play Prompt — reads OTP from Lambda attribute
$.Attributes.VoiceMFA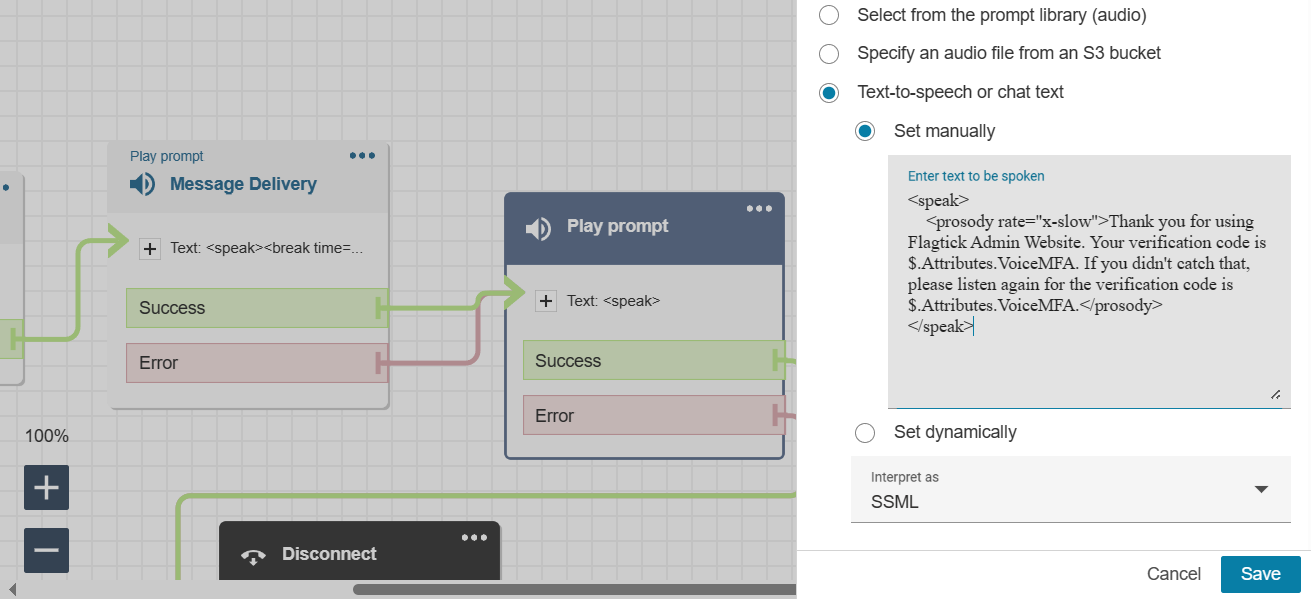
Disconnect — end the call
Then claim a phone number (Routing → Phone numbers → Claim):
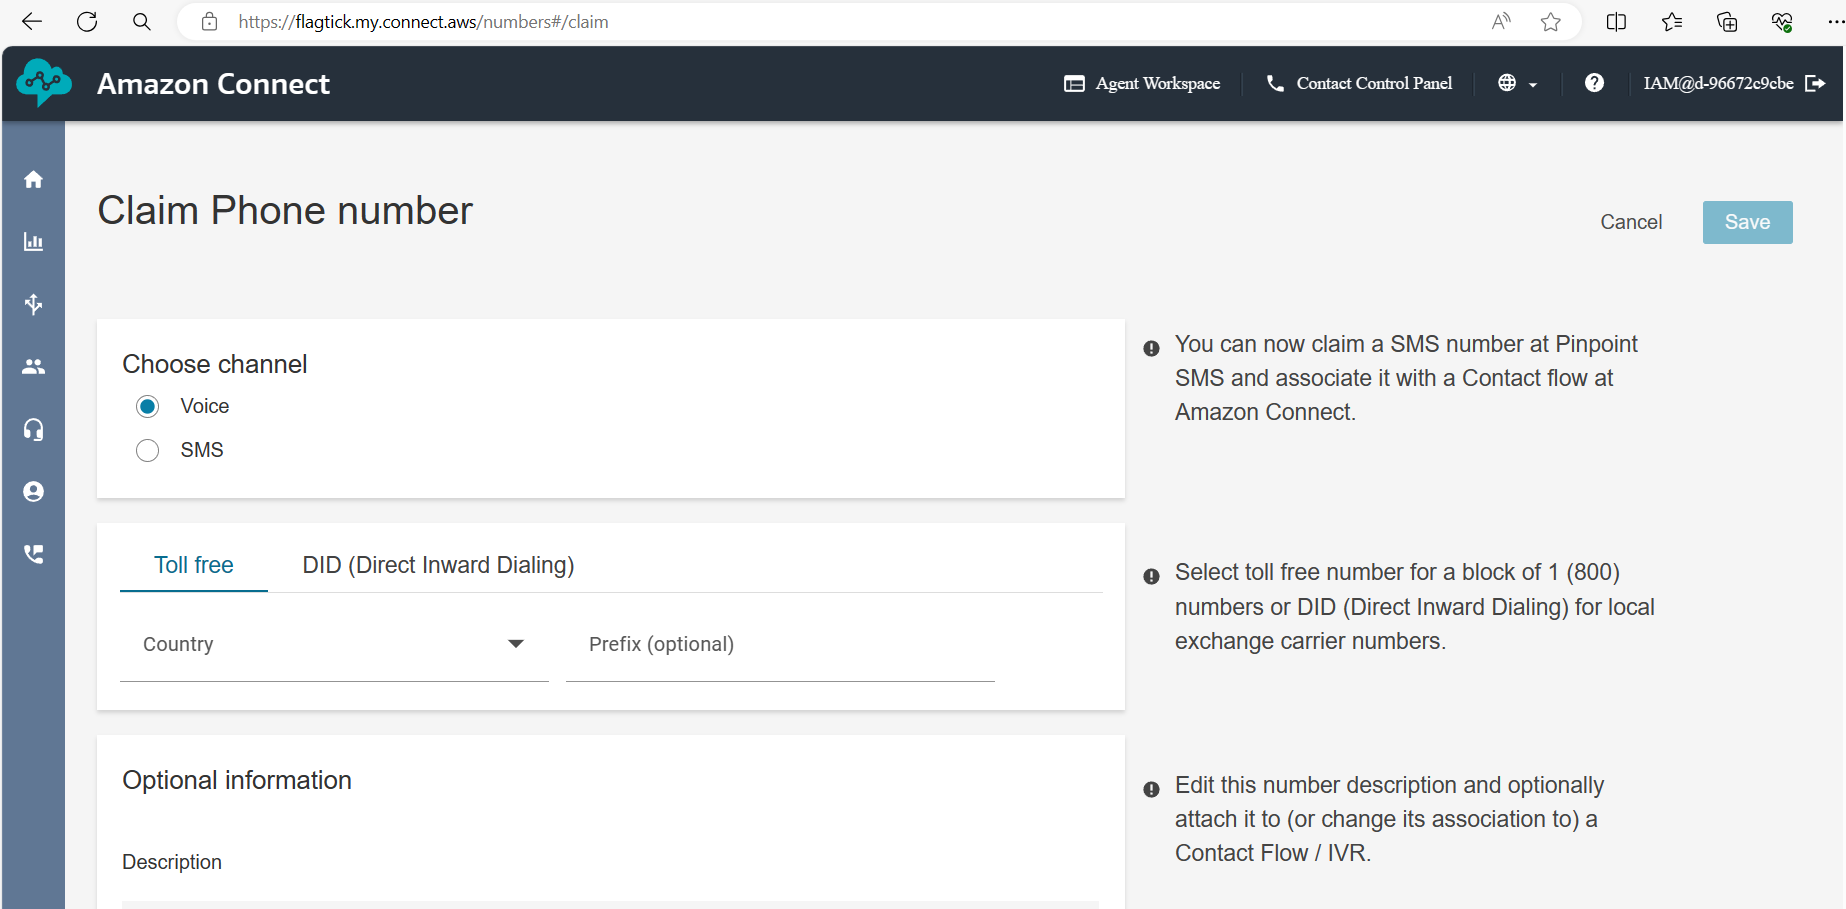
Use this number as:
SourcePhoneNumberAWS Lambda functions with Amazon Connect
Amazon Connect does not generate OTP codes — that is handled by Lambda.
Lambda integrates with:
✔ API Gateway
✔ Cognito
✔ Amazon Connect SDK
Create a Lambda function outboundCallFunc.
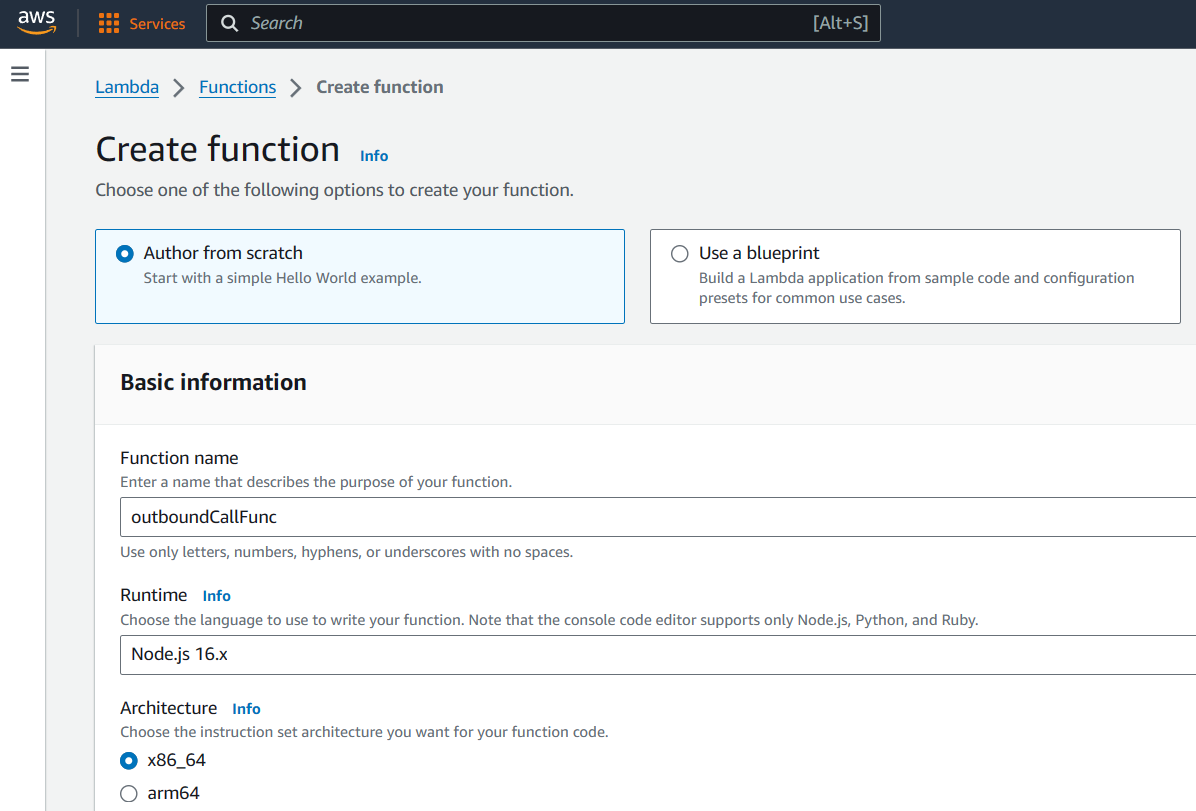
Assign an IAM execution role that allows Connect access.

After creation, note the ARN:
arn:aws:lambda:<region>:<AWS Account ID>:function:outboundCallFuncLambda Code (index.js)
const crypto = require('crypto');
const { outboundVoiceFunc } = require('./MFA.js');

exports.handler = async (event) => {
  const otp = crypto.randomInt(100000, 999999).toString();
  const spacedOtp = otp.split('').join(' ');

  await outboundVoiceFunc({
    phoneNumber: "+12139156465",
    contactFlowId: "fda6f30e-6cbf-4d78-87ca-94164ae2baa4",
    otpCodeStr: spacedOtp
  });

  return event;
};Lambda Code (MFA.js)
const AWS = require('aws-sdk');
AWS.config.update({ region: process.env.region });

const connect = new AWS.Connect();

async function outboundVoiceFunc({ phoneNumber, contactFlowId, otpCodeStr }) {
  const params = {
    DestinationPhoneNumber: phoneNumber,
    ContactFlowId: contactFlowId,
    InstanceId: '8e5bb349-23f0-478a-ac58-e09ba143ec3a',
    SourcePhoneNumber: '<claimed-phone>',
    Attributes: { VoiceMFA: otpCodeStr }
  };

  return connect.startOutboundVoiceContact(params).promise();
}
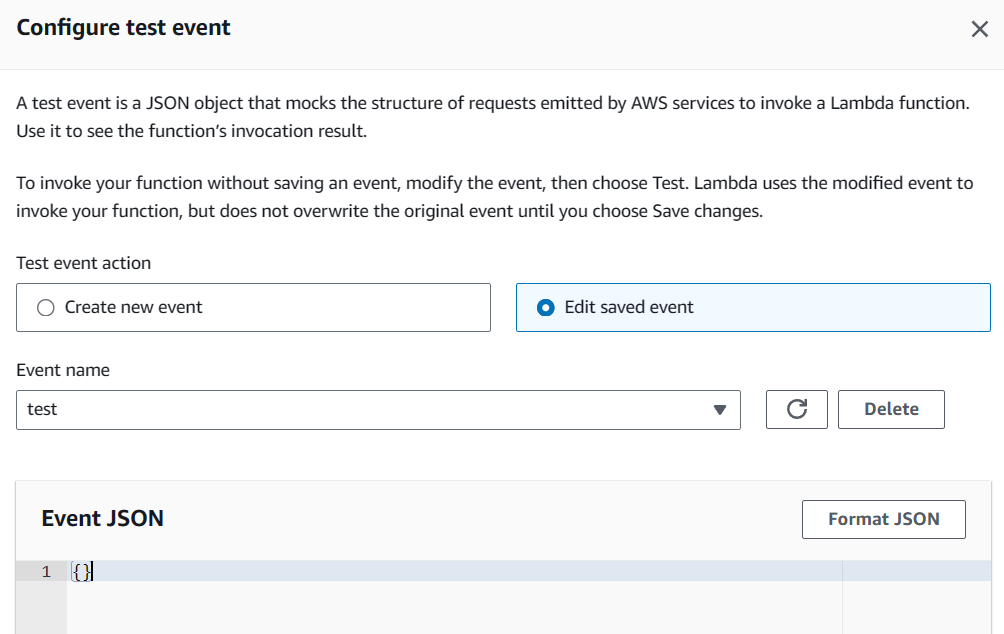
module.exports = { outboundVoiceFunc };Test Lambda
If missing IAM permissions:
AccessDeniedException: User is not authorized to perform connect:StartOutboundVoiceContactFix in IAM:
Reference: https://www.shiftsaas.com/amazon-connect/set-up-iam-policies-for-lambda-using-amazon-connect/
Deploying Lambda Using AWS CLI
Set IAM credentials:
SET AWS_ACCESS_KEY_ID=<Access Key>
SET AWS_SECRET_ACCESS_KEY=<Secret Key>
SET AWS_SESSION_TOKEN=<Session Token>Install & verify:
# install per AWS docs
aws --version
aws configureIAM policy (policy.json):
{
  "Version": "2012-10-17",
  "Statement": [
    {
      "Sid": "Statement2",
      "Effect": "Allow",
      "Action": ["connect:StartOutboundVoiceContact"],
      "Resource": "arn:aws:lambda:ap-southeast-1:<AWS Account ID>:function:outboundCallFunc"
    }
  ]
}Folder structure:
C:\Users\admin\Documents
├── policy.json
├── index.js
└── MFA.jsDeploy:
zip -r function.zip index.js MFA.js

aws lambda create-function \
  --function-name outboundCallFunc \
  --runtime nodejs16.x \
  --handler index.handler \
  --zip-file fileb://function.zip \
--role arn:aws:iam::<AccountID>:role/outboundCallRoleUpdate later:
aws lambda update-function-code \
--function-name outboundCallFunc \
--zip-file fileb://C:/Users/admin/Documents/function.zipIntegrating Voice OTP with Cognito Custom Authentication Flow
Install library:
npm i amazon-cognito-identity-jsClient-Side Cognito Code
import { AuthenticationDetails, CognitoUser, CognitoUserPool } from 'amazon-cognito-identity-js';

const poolData = {
  UserPoolId: 'your_pool_id',
  ClientId: 'your_client_id'
};
const userPool = new CognitoUserPool(poolData);

const user = new CognitoUser({ Username: 'username', Pool: userPool });
user.setAuthenticationFlowType('CUSTOM_AUTH');Authenticate:
const details = new AuthenticationDetails({
  Username: 'username',
  Password: 'password'
});

user.authenticateUser(details, {
  customChallenge: () => {},
  onSuccess: () => {},
  onFailure: () => {}
});In Cognito, open your User Pool, go to Triggers, and add the Custom Authentication triggers.

Start by implementing defineAuthChallenge, which decides the next step in the flow and enforces retry rules. Example:
// defineAuthChallenge/index.js
exports.handler = async (event, context) => {

  if (
      event.request.session &&
      event.request.session.length === 1 &&
      event.request.session[0].challengeName === 'SRP_A' &&
      event.request.session[0].challengeResult === true
    ) {
      event.response.issueTokens = false;
      event.response.failAuthentication = false;
      event.response.challengeName = 'PASSWORD_VERIFIER';
    } else if (
      event.request.session &&
      event.request.session.length === 2 &&
      event.request.session[1].challengeName === 'PASSWORD_VERIFIER' &&
      event.request.session[1].challengeResult === true
    ) {
      event.response.issueTokens = false;
      event.response.failAuthentication = false;
      event.response.challengeName = 'CUSTOM_CHALLENGE';
    } else if (
      event.request.session &&
      event.request.session.length >= 5 &&
      event.request.session.slice(-1)[0].challengeName === 'CUSTOM_CHALLENGE' &&
      event.request.session.slice(-1)[0].challengeResult === false
    ) {
      // User has made three unsuccessful attempts to enter the correct OTP
      event.response.issueTokens = false;
      event.response.failAuthentication = true;
    } else if (
      event.request.session &&
      event.request.session.length > 0 &&
      event.request.session.slice(-1)[0].challengeName === 'CUSTOM_CHALLENGE' &&
      event.request.session.slice(-1)[0].challengeResult === true
    ) {
      // User has successfully entered the correct OTP
      event.response.issueTokens = true;
      event.response.failAuthentication = false;
    } else {
      // User has not provided a correct answer yet
      event.response.issueTokens = false;
      event.response.failAuthentication = false;
      event.response.challengeName = 'CUSTOM_CHALLENGE';
    }
    return event;
};Notes:
- The first challenge (
SRP_A) is handled by Cognito;PASSWORD_VERIFIERfollows. - The code uses
session.lengthto track progress; >=5 logic handles repeated failed OTP attempts. - Ensure Cognito’s built-in MFA is disabled for this custom flow scenario (otherwise the flow may conflict).
Now let us move on to createAuthChallenge, the function responsible for producing the OTP and initiating the call.
// createAuthChallenge/index.js (Lambda)
const crypto = require('crypto');
const { outboundVoiceFunc } = require('./MFA.js');

exports.handler = async (event) => {
  let otpCode = '';
  let phoneNumber = event.request.userAttributes['custom:YourPhone'];

  try {
    if (event.request.session.length === 2) {
      optCode = crypto.randomInt(100000, 999999).toString();

      await startOutboundVoiceContact({
        phoneNumber: `${phoneNumber}`,
        contactFlowId: '<contact flow id>',
        optCode: optCode,
      });
    } else {
      // Reuse previous code for retries
      const previousChallenge = event.request.session.slice(-1)[0];
      optCode = previousChallenge.challengeMetadata ?? '';
    }

    const expireAt = Date.now() + (15*60_000);
    event.response.privateChallengeParameters = {
      optCode,
      expireAt: expireAt.toString(),
    };
    event.response.challengeMetadata = optCode;
  } catch (error) {
    event.response.issueTokens = false;
    event.response.failAuthentication = true;
  }
  return event;
};Since the main Lambda stays focused on authentication, the OTP and call logic are placed in a helper module, which you can see next.
// createAuthChallenge/MFA.js
const AWS = require('aws-sdk');
AWS.config.update({ region: process.env.region });
const connect = new AWS.Connect();

async function outboundVoiceFunc({ phoneNumber, optCode, contactFlowId }) {
  try {
    const otpCodeStr = optCode.toString().split('').join(' ');
    const connectParams = {
      DestinationPhoneNumber: phoneNumber,
      ContactFlowId: contactFlowId,
      InstanceId: '<instance id>',
      SourcePhoneNumber: '<source phone>',
      Attributes: { 'VoiceMFA': otpCodeStr }
    };
    return await connect.startOutboundVoiceContact(connectParams).promise();
  } catch (error) {
    throw error;
  }
}
module.exports = { outboundVoiceFunc };The last step is to implement verifyAuthChallenge, responsible for confirming whether the provided OTP is correct.
// verifyAuthChallenge
exports.handler = async (event) => {

  const expireAt = event.request.privateChallengeParameters['expireAt'];
  if (expireAt) {
    if (Date.now() > +expireAt) {
      event.response.answerCorrect = false;
      return event;
    }
  }
  const expectedAnswer = event.request.privateChallengeParameters['optCode'];
  event.response.answerCorrect = event.request.challengeAnswer === expectedAnswer;
  return event;
};What’s next
In the next part, we will walk deeper into IAM so you fully understand why the outbound call failed with AccessDeniedException and how assumed roles work behind the scenes. You will:
- Understand what an assumed role is and how Lambda uses it during execution.
- See how IAM Users, Groups, and Roles differ and work together.
- Inspect the outboundCallRole created for your Lambda function.
- Attach a least-privilege inline policy to allow
connect:StartOutboundVoiceContactonly for youroutboundCallFunc. - Review IAM permissions using both a management account and
Control Tower–managed identities.
Before You Continue
Make sure you have:
- Access to IAM (either management account or Control Tower delegated admin).
- The ARN of your Lambda function
outboundCallFunc(needed for the Resource field). - The Amazon Connect instance details, including Contact Flow ID and Instance ID.
- Your Lambda code deployed and tested so you can reproduce the error.
👉 When you are ready, continue to:
Grant IAM Permissions for Assumed Roles in Lambda https://www.shiftsaas.com/amazon-connect/set-up-iam-policies-for-lambda-using-amazon-connect/